In this comprehensive guide, you will find out how to pull an espresso shot with a perfectly balanced flavor, satisfying texture, and pleasant mouthfeel.
In this post, I go over the basics. These include espresso grind, coffee ratio, and the ideal size of a shot in grams and milliliters.
Furthermore, I describe the full process of making an espresso shot in a step-by-step guide with photos.
Understanding the importance of coffee dose distribution, tamping, and proper timing is essential if you want to improve your espresso-making skills.
Moreover, here you shall find useful tips on fine-tuning the extraction variables to get a perfect shot that looks great and has outstanding flavor.
Nevertheless, achieving perfection once isn’t enough. In this post, I describe effective practices, and recommend coffee tools that will help you get consistently good results each time you pull an espresso shot.
So let’s stop wasting any more time and get started!
How to Pull an Espresso Shot?
Espresso is prepared through an extraction method that involves running hot water (88°C – 96°C/190.4°F – 204.8°F) under pressure (around 8-9 bars) through a puck of finely ground coffee beans.
In most espresso machines, the hot water is forced through the ground coffee thanks to an electric pump. Nevertheless, in order for the optimal pressure to build at the group, the coffee puck should also provide enough resistance. You can make that happen through your coffee dose preparation technique.
Furthermore, by knowing how to fine-tune and control the espresso brewing variables, you can improve extraction quality massively.
In the current article, I point out and explore in detail all of the essential factors that influence espresso extraction.
By understanding their impact and taking advantage of my tips, you will get to enjoy excellent shots, such as those prepared by a professional barista.
So here is the quick rundown of the steps on how to pull an espresso shot:
- Use a scale to weigh the coffee dose.

- Grind the coffee beans by using a fine grind setting.

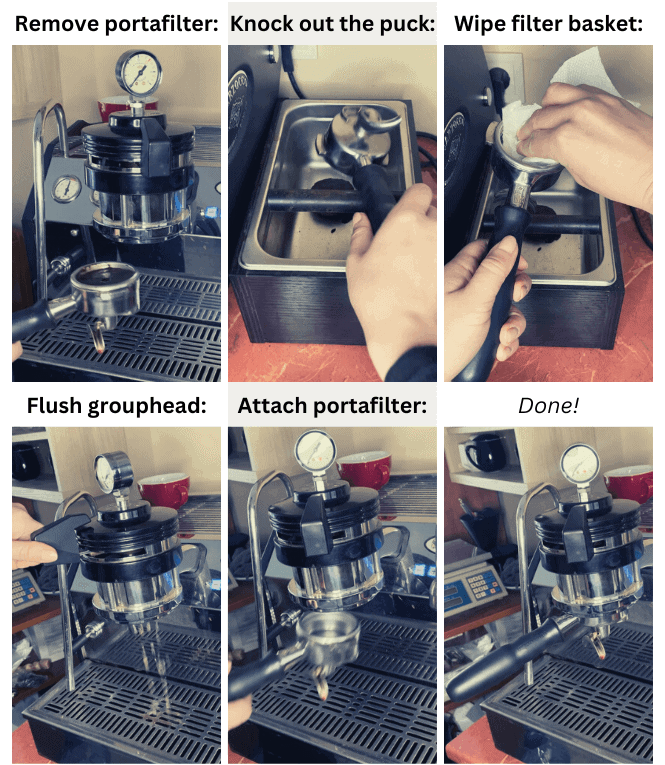
- Remove the portafilter from the grouphead.

- Wipe the filter basket with a clean cloth.

- Add ground coffee to the filter basket.

- Shake the portafilter to even out the grounds and distribute them.

- Tamp the coffee bed.

- Swipe away excess coffee grounds from the rim of the filter basket.

- Flush the group head.

- Insert portafilter into the grouphead.

- Place a scale and a cup on the drip tray under the pouring spout.

- Start the pump and the timer simultaneously.

- Observe the shot flow and the scale reading.

- Stop the pump once the desired espresso yield is reached.


After you pull an espresso shot you should do the following:
Let’s explore these espresso-making steps in detail.
1. Weigh the coffee dose.
Using a scale to weigh the coffee dosage is essential if you want to pull consistent and good espresso shots.
Coffee ratios are measured in grams instead of ounces for more precision and accuracy.
But how many grams of coffee do you need to use for espresso?
According to espresso standards, a single espresso shot is made with a coffee dose of 7 to 8 grams for a 30 ml. drink. Respectively, a double espresso shot is prepared with 14 to 16 grams of ground coffee for a 60 ml. drink.
Nevertheless, nowadays, there is a trend for making espresso with a higher coffee dose – sometimes over 18 grams for a double shot.
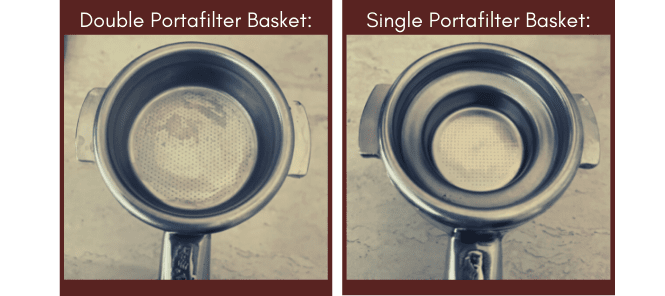
How many grams of coffee you use for your homemade espresso also depends on the filter basket capacity. A single basket would typically accept 7 to 12 grams of ground coffee, while a double – 16 to 18 grams (sometimes over 20 grams of light-roasted coffee).
Related Post: Single vs. Double Shot Espresso: Comparison
For this particular guide, I used 17 grams of finely-ground light-roasted coffee.
When it comes to the espresso ratio, there’s also variability.
Traditionally, both single and double espresso shots are made with the 1:2 coffee-to-water ratio. For example, if you want to pull a double espresso shot, you need to use 14 grams of coffee and produce 28 grams of espresso beverage. The ideal extraction time is within the range of 22 seconds and 28 seconds for both single and double espresso shots.
The 1:2 espresso ratio is a great starting point when trying to get into the perfect zone of espresso extraction.
Nevertheless, you can diverge away from the traditional proportion, if you feel like doing so will improve extraction quality and flavor.
If you’re a beginner at pulling espresso shots at home, I recommend using the following chart on the suggested espresso brewing parameters for guidance:
| Espresso Shot: | Dose: | Yield (Weight) | Yield (Volume) | Extraction Time: | Brew Ratio: |
|---|---|---|---|---|---|
| Single Shot | 7-10 grams | 10.5-20g grams | 25-30 milliliters (around 1 fl. oz.) | 20-30 seconds |
1:1.5 to 1:2.5 |
| Double Shot | 14-20 grams | 21-50 grams | 50-60 milliliters (around 2 fl. oz.) | 20-30 seconds |
1:1.5 to 1:2.5 |
I’d often find that using more water for the same amount of coffee results in a better-tasting shot.
This happens when I use lightly roasted Arabica coffee beans. In such cases, I’d go for the 1:2.5 or 1:3 coffee-to-water ratio. But I’ll discuss the recipe adjustments for extraction and flavor improvement in more detail later in the post.
Author’s Note:
Keep in mind that, in the world of coffee, when brewing ratios are being discussed, we always consider weight, not volume. This particularity is quite important, especially when it comes to making espresso.
After you pull a shot, a portion of the drink’s volume is taken by espresso crema. The creamy layer of microbubbles on the surface of your espresso doesn’t tell much about extraction.
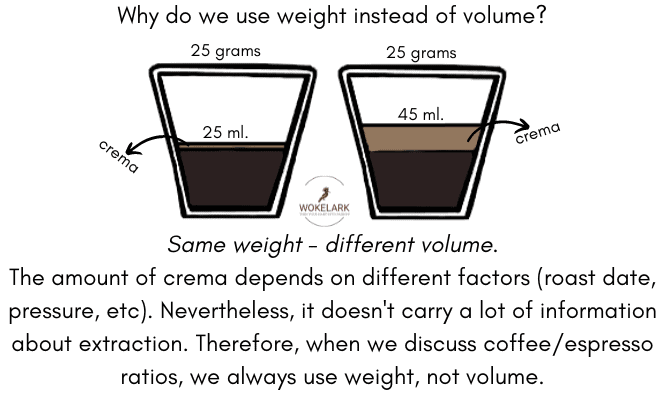
That’s why you should measure the espresso yield in grams, not milliliters. For this purpose, you’d need an accurate gram scale.
As you see, using a coffee scale is an essential part of the process of pulling an espresso shot.
This instrument comes in handy when measuring the coffee dose in the beginning and weighing the espresso yield at the end.
You can check out my guide on the best coffee scales for some great product recommendations. In it, you will find reviews of accurate gram scales with built-in timers. Moreover, you will see affordable compact scales that would perfectly fit on the drip tray of your espresso machine.
2. Grind the coffee beans.
Once the coffee is ground, it starts oxidizing and losing its flavors faster because more of its surface is exposed to oxygen.
Therefore, to pull a perfect espresso shot, you need to use freshly ground coffee beans.
The quality of the grind is also of great importance. If the grind isn’t fine enough or the size of the coffee particles varies within a wide range, it’s impossible to get proper espresso extraction.
So you’d need to invest in a high-quality burr grinder that produces an even and consistent fine espresso grind. Furthermore, it should allow you to make fine-enough grind adjustments to dial in the espresso, depending on the type of coffee beans you use.
When it comes to grinders for espresso, there are a few basic options that you can choose from:
- A manual burr grinder, such as the 1zpresso J MAX.

It’s a high-quality, yet affordable option that provides ideal results for fine espresso grinding.Furthermore, the step adjustment size is fine enough for precise espresso dialing-in.
- On-demand electric grinder, such as the Eureka Mignon Silenzio.

An on-demand grinder lets you set a timer for the desired coffee dose.The weight of the coffee dose, produced for a certain amount of time, would also depend on the grind size.
If you adjust the grinder to a coarser setting, it will dispense fewer grams of coffee, compared to when grinding on a finer setting.
So you should figure out the ideal grind size and how many grams of coffee you want to use for single and double shots. Then you can program the on-demand grinder to dispense the desired amount of ground coffee each time.
- A dosing grinder, such as the Rancilio HSD-ROC-SS.

It has a dosing chamber that holds the freshly ground coffee.At a flip of a switch, you can dispense a coffee dose of around 7 grams into the portafilter.
Nevertheless, in order for the doser to work properly and discard an adequate amount of ground beans, it has to be full. So if you plan on pulling only a shot or two per day, it may not be the most efficient option.
- A doserless grinder, such as the Rancilio Rocky.

It would grind all of the beans inside the hopper as long as you hold its grinding switch.


In the following photo, you can see the espresso grind size that I used for this guide.

3. Remove the portafilter from the grouphead.
When you remove the portafilter, you may see that the basket seems a bit wet.
There may also be a few coffee particles in the basket that have remained from the previous shot.
This happens even if you’ve discarded the grounds and wiped the portafilter basket after your previous pull. After all, some grounds get stuck to the grouphead screen. This leads to the following step.
4. Wipe the filter basket with a clean cloth.
To avoid channeling and pull a perfect espresso shot, before every reload, the basket should be dry-wiped and clean.
In order to do that I’d either use a clean cloth or a piece of kitchen roll paper.
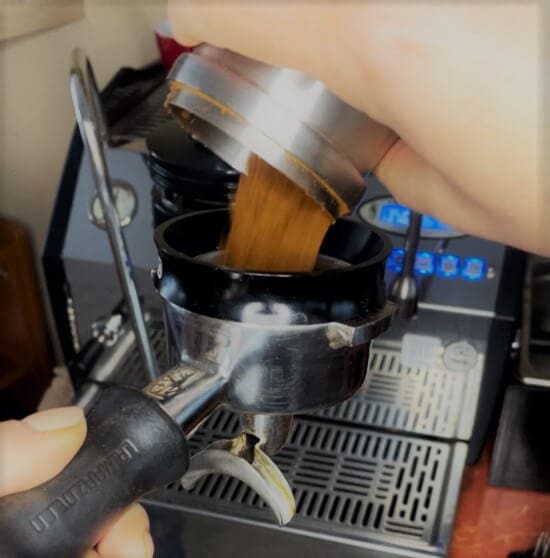
5. Add ground coffee to the filter basket.
There are helpful espresso accessories that will make it easier for you to add ground coffee to the filter basket.
You can use a coffee dosing cup with a diameter of your portafilter.

Most commercial-style portafilters have a diameter of 58mm.
The dosing cup will help you eliminate the mess and prevent coffee wastage when emptying the grounds into the portafilter.

Check out the price of the Stainless steel 58mm dosing cup by Rhino on Amazon here.
Another option would be to use a dosing funnel.

Click here to check out the price of the espresso dosing funnel by the brand MATOW (58mm)
Not only does it prevent coffee waste, but it also eases the process of grind distribution. While left secured on the surface of your portafilter, you can easily distribute the grounds with one of the espresso accessories that are mentioned in the next section.

6. Shake the portafilter to even out the grounds and distribute them.
Once you discard the coffee grounds into the portafilter they will be mounded above the top of the basket. Even more so if you use a higher coffee dose of 18-20 grams.
You need to shake the portafilter or knock it gently on the countertop surface to level the mounded area.
To even out the grounds, you can also tap the portafilter a few times on its sides, or use your index finger to level its surface.

Grind distribution is an essential part of the process of pulling an espresso shot.
This step percedes tamping and ensures that the water passes through all of the coffee particles at the same speed and pressure.
Proper distribution prevents channeling, and increases extraction evenness, and therefore – extraction quality.
Instead of passing evenly through all the coffee grounds, as a result of poor grind quality, or uneven distribution and tamping, the stream of water passes through the paths of least resistance.
This creates channels in the coffee puck.
As a result, some of the coffee grounds get over-extracted (unpleasantly bitter), while others – under-extracted (unpleasantly sour).
This influences espresso extraction in a bad way and results in an unbalanced flavor. Espresso channeling should be avoided, especially if you’re aiming to make the perfect espresso shot.
There are helpful tools that will make grind distribution easier. Here are some examples:
- A coffee distributor, such as this tool by Apexstone.

Click here to check out its price and more photos on Amazon. - Espresso coffee stirrer, such as this one by the brand WOOUCH:

Click here to check out its price and more photos on Amazon.This method of coffee distribution is also known as the Weiss Distribution Technique (WDT).
It was introduced by John Weiss on the Home Barista website forum in 2005. You can easily make a DIY WDT tool, by using a cork and wire, or acupuncture needles.


7. Tamp the coffee grounds.
Tamping is done through the use of a flat metal disc with a handle (known as an espresso tamper).
The process involves compressing the ground coffee down into the filter basket.
Tamping removes the air between the coffee particles and creates a flat and even puck.
This ensures that the pressurized water would flow through all of the coffee grounds evenly.
Furthermore, it promotes proper pressure build-up in the filter basket.
With that being said, when it comes to channeling avoidance, good distribution is more important than firmly tamping the coffee puck.
Nevertheless, if tamping is performed badly, it can, in fact, lead to channeling and unbalanced extraction.
To avoid that you should:
- Make sure the tamper fits accurately in the filter basket. In other words, you need to get a properly-sized tamper that matches your portafilter basket’s diameter.
- Place the portafilter on a flat surface.
- Place the tamper parallel to the surface of the coffee grounds.
- Compress ergonomically, by applying even pressure on all sides.
The recommended espresso tamping pressure is between 20 and 30 pounds (9 kg – 14 kg). Some baristas would spin the tamper when pressing down. Nevertheless, I don’t recommend that – spinning can dislodge the puck.
Dosing, distribution, and tamping consistency are essential if you want to replicate the espresso extraction profile that you like. Replicating good results may seem hard if you’re a beginner.
Nevertheless, through practice, you will get to improve your technique and pull consistent shots of espresso.
Furthermore, there are tools that provide more consistency and control over the espresso-making variables.
One such device is the automatic coffee tamper by PUQpress.
You can program it to apply the same pressure to the coffee dose each time you prepare a shot.

It has 2.2 pounds (1 kg) step adjustments within the range of 22 to 66 pounds (10 kg to 30 kg). Some models can apply lower pressure of 11 to 22 pounds (5 to 10 kg) which is also intriguing to explore..
8. Swipe away excess coffee particles from the rim of the filter basket.
You can do that with your finger. This step ensures a proper seal between the grouphead and the portafilter.
9. Flush the grouphead.
By running a bit of water through the grouphead before inserting the portafilter, you will remove any coffee residue left from the previous shot.
10. Insert the portafilter into the grouphead.
After you secure the portafilter to the grouphead, you should complete the following steps promptly.
The heat that comes from the grouphead increases the speed of coffee oxidation and flavor deterioration.
Ideally, you should aim to have the pump started within 5 seconds after you’ve inserted the portafilter.
11. Place a cup on a scale on the drip tray of the espresso machine.
The scale is necessary to measure the espresso yield and stop the pump once the desired weight is reached.
12. Start the pump and the timer.
Many beginners wonder when they should start the timer when making espresso. Should you wait for the coffee to start pouring out of the spout? Well, no.
You should start timing the moment you activate the water pump. At this point, the hot water will start saturating the grounds and extracting them. Therefore, espresso shot timing starts when extraction starts.
Espresso timing isn’t mandatory if you’ve already figured out the ideal espresso parameters for the particular beans you use.
Say you’ve dialed in the grind size that results in a perfect espresso. And you’ve tested that the flavorful shot extracts within an adequate time frame. Next time you can only observe the scale reading and stop extracting whenever the desired espresso weight is reached.
13. Observe the shot flow and scale reading.
Observing the shot flow can tell you much about the job you’ve done.
While pulling, the espresso stream should look something like warm honey – somewhat creamy and thick.
If the flow isn’t smooth and even, there may be channeling.
By observing the shot you can make conclusions about the distribution and tamping quality, and overall – the puck-preparation work you’ve done.
Consequently, you can make improvements easier.
14. Stop the pump when the desired espresso yield is reached.
When the scale reading shows the desired weight of espresso yield, you should stop extracting.
At this point, you should also stop the timer.
Making Adjustments for Flavor Improvement
Pulling the best espresso shot is a process that takes a bit of trial and error to find the optimal brewing parameters for the coffee beans you use.
Even if espresso is extracted within the standard parameters and has an extraction percentage within the ideal espresso range (18% – 22%), its flavor should be the one guiding you.
If you sense over-, under-extraction, or an unpleasant off-balance taste, you should make adjustments to one (or more) of the brewing variables.
But what characteristics does the “perfect espresso shot” have?
The perfect espresso shot has a well-rounded flavor with balanced acidity, sweetness, and bitterness. Its crema is hazelnut-colored and consistent. Furthermore, If you’ve done a great job at making your shot, you should sense at least a few of the flavor notes, listed on the bag of your coffee beans.
Now let’s see what characteristics a “bad” espresso has.
- Over-extracted espresso is often characterized by a persistent astringency. It has poor crema (often dark with a light spot), and an unpleasant burnt/bitter flavor.
- Under-extracted coffee has a thin body, harsh acidity, and is unpleasantly sour. Its flavors are underdeveloped and the crema is thin and light-colored.
- If the grind wasn’t consistent enough, or if there was channeling, you may get both over- and under-extracted flavors in your espresso shot.
If you get such flavor imbalance, the next time you pull a shot you should be more cautious during dosing, distribution, and tamping.
To avoid channeling, make sure the basket is clean and dry, and the dose is evenly distributed. You should also tamp level and straight, and you shouldn’t tap the portafilter after tamping.
To improve the flavor of your espresso shot you can make:
- Grind size adjustment. Grind finer if you sense flavors of under-extraction. The finer the grind, the more surface area for extraction. On the other side, if your espresso shot is harshly bitter, then it’s over-extracted. So you may want to grind coarser next time you pull a shot.
- Coffee dose adjustment – it can affect both the flavor and the body of your espresso. When making espresso increase the dose, if you want a fuller-bodied shot, and decrease it if the coffee is too bitter and astringent. I’d usually use a higher dose for lighter roasts since it’s harder to extract their solubles, compared to dark roasts. Furthermore, light roasts are denser, so it’s easy to fit a higher dose in the portafilter basket.
- Espresso yield adjustment. I’d run more water through the coffee when using light roasts. Since lightly roasted coffee is less soluble, the 1:2 coffee-to-water ratio often results in flavors of under-extraction. Therefore, pulling a longer shot will give you a more balanced and complex flavor without unpleasant sourness. So if you sense under-extracted flavors in your espresso shot, you can make improvement by increasing the espresso yield. Contrarily, if I pull a shot with a dark roast, I’d use a lower coffee-to-water ratio. This way I avoid espresso bitterness and astringency.
- Water temperature adjustment. Some espresso machines let you adjust the brew temperature. A higher brewing temperature increases extraction. If your shot was over-extracted, use a lower temperature. If it was under-extracted – use a higher temperature.
Author’s Note: Water composition is also very important when it comes to espresso extraction. Even if the brewing parameters are optimal, the hardness and alkalinity of the water you use may negatively influence the results and keep you away from pulling the perfect espresso shot. For more information, check out my post on the best water for coffee.
- Pressure profiling (if possible). Some espresso machines let you modify the pressure, applied to the coffee puck, throughout the process of extraction. A common practice is starting with a lower pressure of 1 to 5 bars to gently soak the coffee grounds before applying the full brewing pressure. This technique is known as pre-infusion. It allows you to grind finer, increase extraction, and reduce channeling.
- Flow profiling (if the machine allows it). It lets you alter the amount of water that passes through the grounds at any given time. This type of control is appreciated by baristas who are trying to bring out some of the more subtle flavors of the coffee beans when pulling a shot.
Dialing in Espresso by Roast Level
The roast level of the coffee beans you use is an important factor that needs to be considered when making espresso.
Light roasts are denser. A certain volume of coffee beans that are lightly roasted would weigh more, compared to the same volume of darkly roasted beans.
That’s why you can fit a higher dose of light-roasted coffee in your portafilter basket. Using light roasts results in espresso shots that have a lighter body, less bitterness, and more acidity.
Such shots have more flavor and aroma complexity.
Nevertheless, lightly-roasted coffee beans are harder to extract. That’s why you should dial in your espresso in a way that prevents under-extraction.
Using a dark roast when making espresso results in a shot that is more bitter, less acidic, and less complex in terms of flavor. Such a shot has a fuller body.
It’s easier to extract the solubles of dark-roasted coffee, which means that over-extraction can often occur.
Check out the following picture for tips on how to dial in espresso, depending on the roast level of the coffee beans you use:

Final Words
I hope that you found useful tips on how to pull the perfect espresso shot at home.
Needless to say, this guide is long overdue. I’ve been planning on making it ever since I started my blog, but I knew it was going to take quite a bit of time. After all, I wanted it to be more detailed and include a lot of useful information and helpful photos for beginner coffee enthusiasts.
I want to thank Veritas for leaving a comment on my Pressurized vs. Non-Pressurized Portafilter article to remind me that this post needs to be written and published.
The tips, included in this espresso guide, apply to both manual/lever and electric espresso machines.
Feel free to leave me a comment below if you have further questions or share your experience of making espresso at home.