The Chemex has established itself in the world of coffee as a classic pour-over brewer, not only because of its aesthetically pleasing looks.
If you use it properly, it will let you extract all the good stuff from your beans, and enjoy an outstanding cup at home.
The combination of the beautifully designed glass carafe and the thick double-bonded Chemex filter results in a one-of-a-kind smooth and clean brew with well-pronounced flavor notes.
In this brewing guide, I will share some tips on how to use your Chemex coffee maker.
Here you will find all the details that an owner of this device needs to know.
We will go over the right coffee-to-water ratio, grind size, and, most importantly – step-by-step instructions that you can easily follow to make flavorful coffee in your elegant Chemex carafe.
Without further ado, let’s dive in!
Chemex Coffee Ratio
Chemex coffee is usually made with the 1:16 or 1:17 coffee-to-water ratio.
(To be precise, the 1 to 16.6 ratio is the most common one.)
This means that you should use 60 grams (2.11 oz.) of ground coffee for a liter (34 fl. oz.) of water.
For those of you who don’t own a coffee scale, keep in mind that one rounded tablespoon of ground coffee usually weighs between 7 and 9 grams.
This means that for 34 fl. oz. (a liter) of water, you should use around 7 or 8 rounded tablespoons of coffee.
Anyway, you can check out the following Chemex Coffee Brew Ratio Chart for guidance:
| Water: | Ground Coffee (by weight) | Ground Coffee (by volume) |
|---|---|---|
| 200 grams (~ 7 oz.) | 12 grams (0.5 oz.) | 1.5 – 2 tbsp. |
| 350 g (12 oz.) | 21 grams (0.7 ounces) | 2 – 3 rounded tablespoons |
| 500 grams (17.6 oz.) | 30 grams (1 oz.) | 3.5 – 4.5 rounded tablespoons |
| 750 grams (26.4 oz.) | 45 grams (1.6 oz.) | 5 to 7 rounded tablespoons |
| 1 liter (34 fl. oz.) | 60 grams (2 oz.) | 6.5 – 8.5 rounded tablespoons |
You can make good Chemex coffee without a coffee scale.
Nevertheless, using one will provide precision and will, ultimately, make it easier for you to achieve consistency and brew delicious coffee each and every time.
You can check out my guide on the best scales for coffee where you’ll find my top picks and their reviews.
I own and use a Timemore Black Mirror digital scale with a timer, which is perfect for Chemex pour-over brewing.
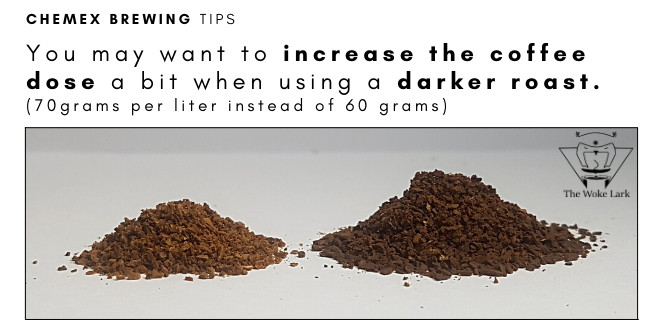
The higher (~ 1:14) coffee-to-water ratio I combine with a lower brewing temperature – around 185°F – 194°F (85°C – 90°C).
This provides more complexity and smoothness, which are often lacking when brewing with darker roasts.
Nevertheless, the aforementioned 1 to 16 – 1 to 17 coffee-to-water ratio works well with all coffee roast profiles, so if you aren’t that rigorous about your coffee, stick to my original recommendation.
Chemex Grind Size
To make coffee in your Chemex you should use a medium-coarse grind.
It should be slightly coarser than what you would typically use with other ceramic drip brewers, such as the Hario V60.
Related Post: Hario V60 Recipe: Step-by-step Brew Guide
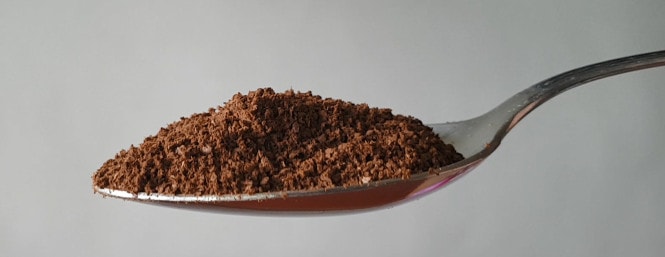
In the following photo you can see the coffee grind I’d normally use with a Chemex when brewing with medium and dark roasted coffee beans:
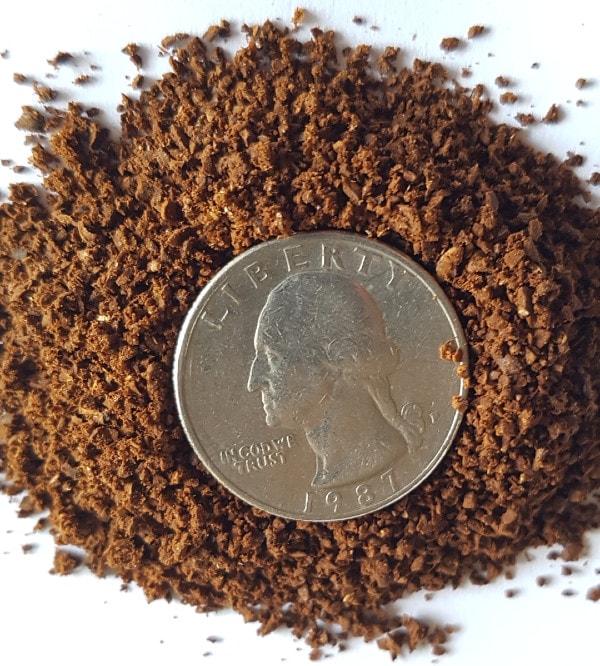
As you see, the coarseness resembles ground sea salt.
No matter whether you brew in a Chemex, or another device, it’s always better to use freshly ground coffee.
Furthermore, grinding your beans at home will make it possible for you to make adjustments to the grind setting.
For example, if the coffee turns out too sour for your liking, you should grind a bit finer. If it’s too harsh and bitter – a bit coarser.
You can check out my guide on the best grinders for pour-over coffee, where you can find the reviews of great manual and electric burr grinders that are ideal for use with a Chemex.
For this brewing guide, I used a great budget-friendly manual grinder – the Timemore Chestnut C2.
For brewing with a Chemex, I usually use 20 clicks for medium and dark roasts, and 18 or 19 clicks for a light coffee roast on my Timemore Chestnut C2.
I recommend grinding a bit finer for lighter roasts.
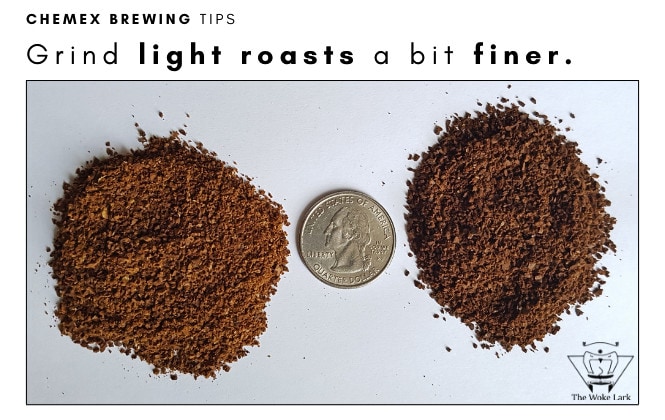
Of course, depending on the exact type of coffee beans and their origin characteristics, I’d be making slight adjustments to the grind, until I get the best flavor.
With that being said, if you aren’t that passionate about coffee, you can, in fact, use pre-ground.
In such a case, the best option would be to go to a local coffee shop and ask for a bag of coffee, ground for a Chemex (drip coffee grind, medium-coarse).
The thing is that once the coffee is ground, it oxidizes and goes stale quicker.
If you want to learn more about how long whole and ground coffee beans last, and how to extend their freshness with proper storage, check out this guide.
Making Coffee in a Chemex: Instructions
Now that you know what’s the proper coffee ratio and grind size, it’s time for the step-by-step Chemex brewing guide.
The recipe directions that I’m about to share are easy-to-follow and will help you use your elegant pour-over device properly.
So here are the steps that you need to follow to make coffee in a Chemex:
1. Pour water into a kettle and bring it to a boil.

Water temperature will affect how your coffee turns out.
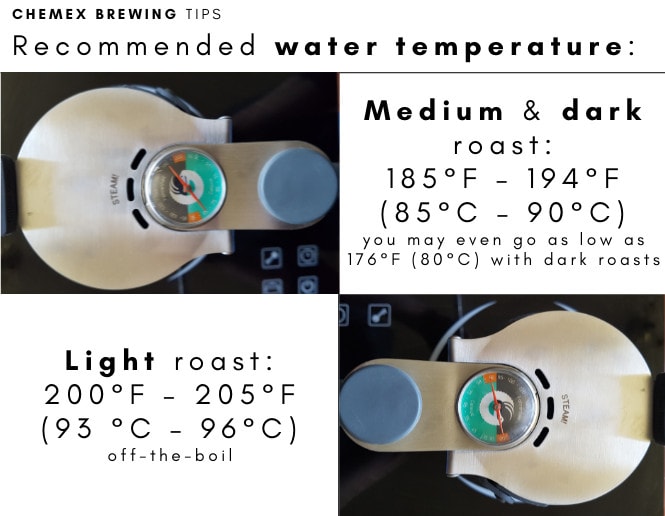
For lighter roasts, I recommend using 200°F – 205°F (93 °C – 96°C) water.
This is pretty much off-the-boil water.
If you don’t own a thermometer or an electric kettle with temperature control, you can simply boil some water and wait for a short while (30 seconds to a minute) for it to settle before you pour it over the coffee bed.
While you wait, you can continue with some of the steps that follow (weigh your dose, grind your beans, place the filter, etc.).
If you brew coffee with a darker roast, you may want to wait for a bit longer after boiling.
Using lower water temperature within the range of 185°F – 194°F (85°C – 90°C) results in better-tasting coffee when the coffee beans are roasted medium or dark.
Avoid using water that’s too hard, or that has an unpleasant taste or smell.
Using filtered tap water is a good option to start with, but if you want to learn more on what’s the best water for coffee, check out this guide.
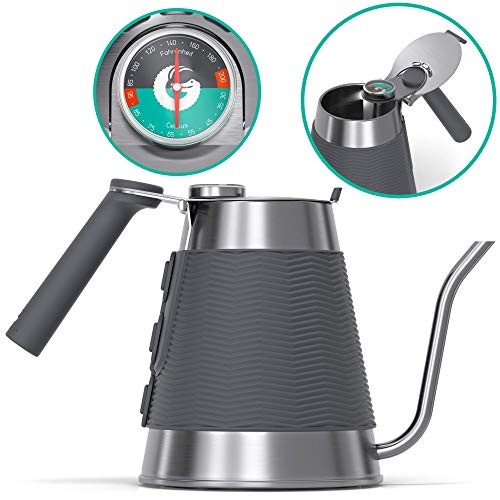
If you’re trying to make the best Chemex coffee, I recommend using a stovetop kettle with a thermometer, or an electric one with variable temperature control.
This type of device will take the guesswork out of the brewing process and provide consistent results.
You can check out my guide on the best gooseneck kettles where you can find reviews of my top picks in this category.
For this particular Chemex brew guide I used Coffee Gator’s Stovetop Gooseneck Kettle that has an integrated thermometer.
2. Weigh your coffee dose and grind your beans.

If you are going to use pre-ground coffee, skip this step.
For the pour-over brew cycle that you see on the photos, I use 35 grams (1.23 oz., around 4 to 5 rounded tablespoons) of coffee (medium roast) and 500 grams (17.6 oz.) of water.
3. Place the filter in your Chemex, so that the three-sheet side faces the spout.
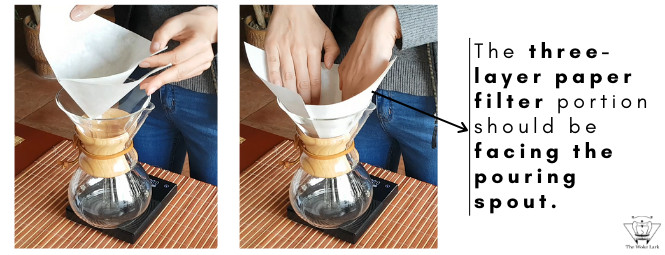
It’s important to place your Chemex filter correctly, as this ensures proper airflow during the process of brewing.
What’s also worth noting is that you should make sure that the filter doesn’t collapse into the spout while you pour water.
There should always be an air gap between the spout and the thick paper filter.

If the spout is blocked, the steam won’t be able to escape from the brewing chamber.
It will apply pressure to the bottom of the filter, which will slow down the drawdown.
This can mess up the extraction, and result in bitter-tasting coffee.
4. Rinse the paper filter with hot water and discard the rinse water.
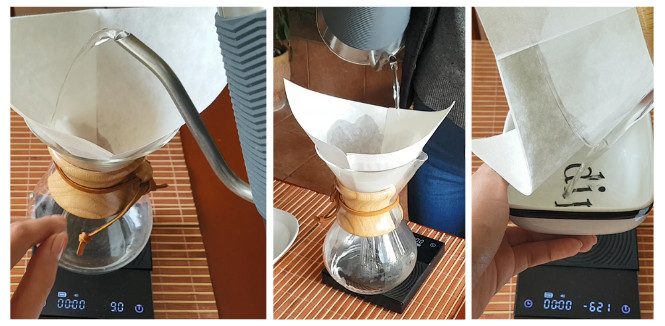
I usually rinse with 60 ml to 90 ml (2 fl. oz. to 3 fl. oz.) of hot water.
This way I avoid paper flavors in my coffee.
Furthermore, the hot water that you use for rinsing, warms up your Chemex vessel, which promotes the maintenance of a higher temperature throughout brewing.
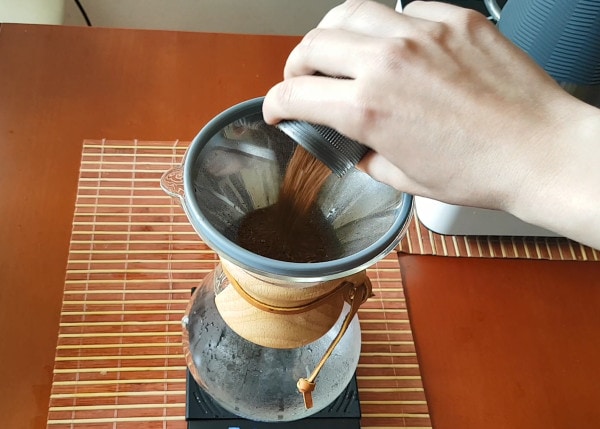
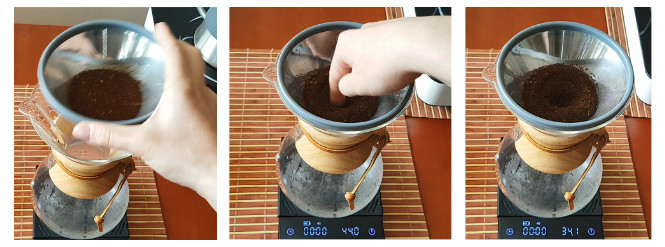
5. Add the ground beans to the filter and shake the Chemex to even the coffee bed.
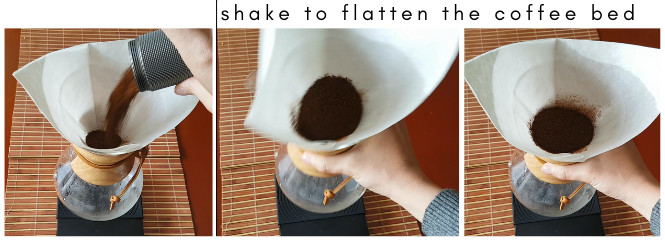
Of course, if you have a scale, the Chemex should be placed on it by the time you add the beans.
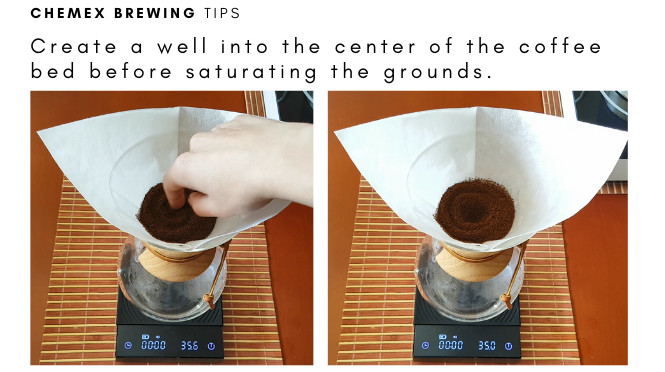
I also recommend creating a well with your fingers, which will make it easier for the coffee grounds to get evenly saturated during the following “bloom” phase.
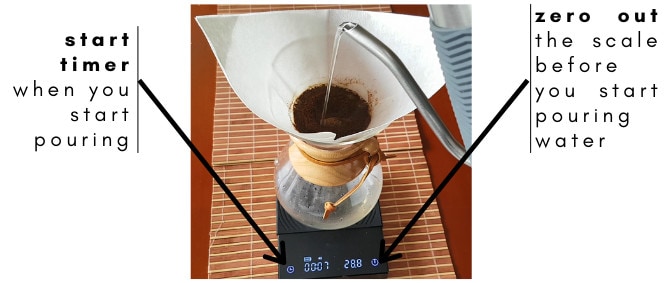
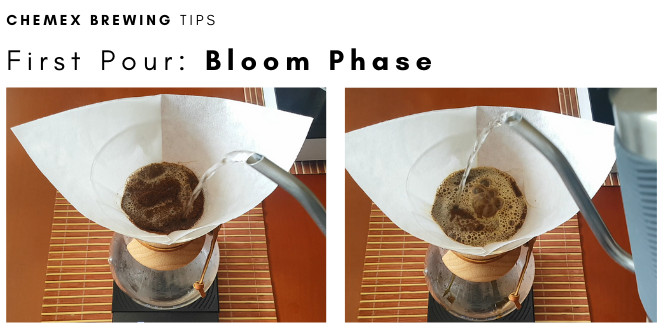
6. Start pouring water over the ground beans in a circular pattern to saturate all the grounds.
If you have a scale, you should zero it out before you start pouring.
If you are to use a timer, you should start the timer at the moment you start pouring.
There will be two or three pours (depending on the amount of coffee you’re brewing and the size of your Chemex carafe).
- First Pour water should be 2 to 3 times the amount of coffee you have.
For example, since I have 35 grams of coffee, I’d be adding 70 to 105 milliliters of hot water during my first pour.
This would be the bloom phase when coffee bubbles and expands (more notably if freshly roasted).

This happens because coffee beans release their CO2.
The process is known as “blooming”.
This step is important as it ensures proper extraction during the following stages.
Once you pour the water for the bloom phase swirl your Chemex.

Blooming should last 30 to 45 seconds. After that, you continue with your next pour. - During your second pour you will be gently and slowly pouring all the remaining water over the grounds.

Make sure you’re using a circular motion and that you’re saturating the grounds evenly.
Don’t splash the water over the coffee bed aggressively.
It’s easier to pour properly if you use a gooseneck kettle, but if you move with care, it can be done with a regular one too.
If the water level reaches the top of the carafe, wait for it to draw down a bit, and maintain the water level right below the top until you’ve poured all the brew water.
You should’ve added all the water by the time your timer reads 1:45 or 2:00.


7. Gently stir the grounds and swirl the Chemex.

Make sure you don’t create a vortex during stirring.
To do that you can stir 2 times in opposite directions.
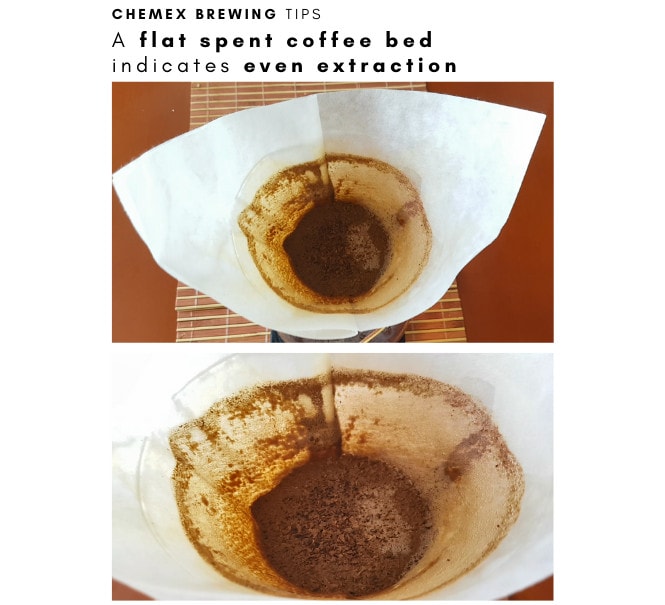
When you make pour-over filter coffee, balanced extraction is always achieved when you have an even coffee bed.
On one side, this step of the Chemex brewing guide improves extraction because of the agitation from stirring.
Furthermore, when you stir you remove the coffee grounds that are stuck to the sides of the filter.

On the other hand, the swirling evens out the coffee bed which ensures proper extraction during drawdown.
Some people call swirling the “Rao Spin”, named after Scott Rao – a coffee expert and author of some great books about coffee.
He’s one of the first more widely known advocates of swirling and its positive effects on coffee extraction.
Nevertheless, James Hoffmann is, likely, the first person who incorporated the swirling step in the process of pour-over brewing.
Anyway, no matter who invented it, it definitely minimizes channeling and results in a more even coffee extraction.
8. Wait for the coffee to draw down.

Brewing coffee with a Chemex coffee maker usually takes between 3.5 and 4.5 minutes.
If your brewing cycle took less time, it may be because your grind is too coarse.
Therefore you may want to adjust it.
If the drawdown takes longer than 4.5 or 5 minutes – the grind is likely too fine.
The water temperature also affects how fast your Chemex brew drains through the filter.
The higher the temperature – the faster the drainage.
Overall, when your timer reads 4:30, the drawdown should be complete.
You can take a look at the coffee bed – it should be nice and flat at the end of your brew.
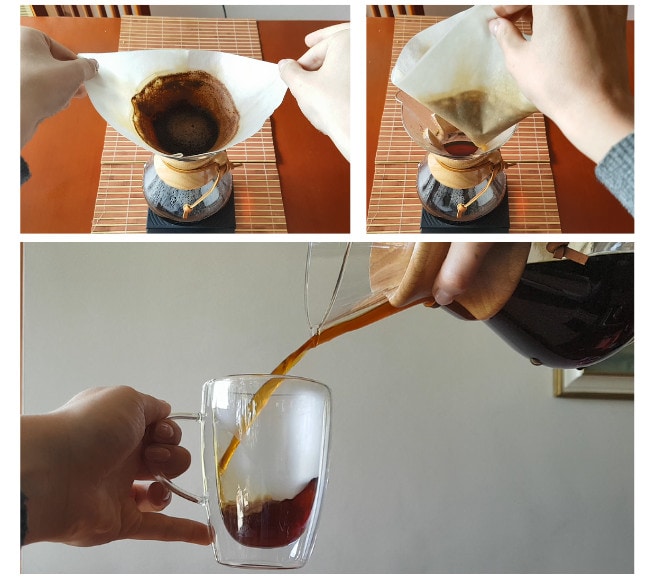
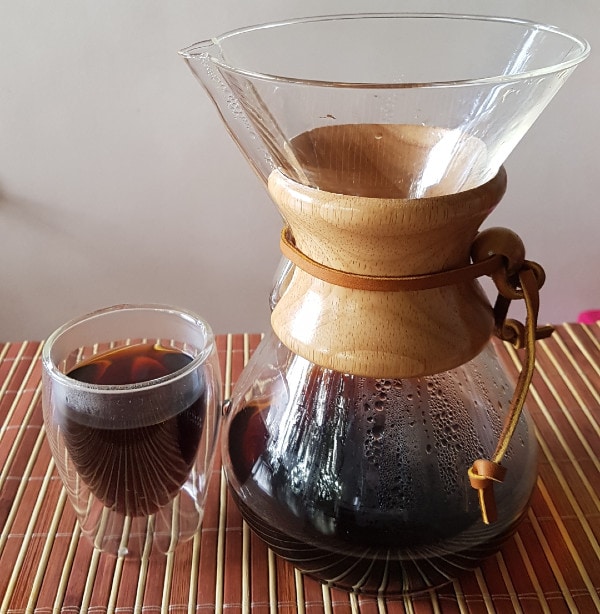
When it comes to yield, when I make Chemex with 16.9 fl. oz. (500 ml) of water, the yield I get is around 14.2 fl. oz (420 ml).
This is enough for around 3 to 4 cups of coffee.
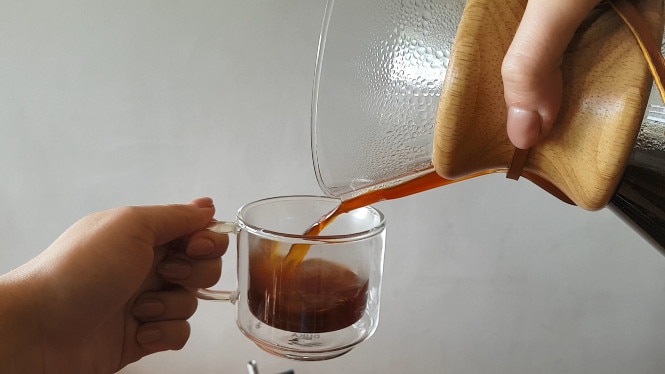
9. Remove the filter and enjoy your Chemex coffee.
Coffee grounds and Chemex filters are actually compostable.
I don’t recommend throwing your spent coffee down the drain.
There are better ways to reuse your coffee grounds.
Author’s Note: Did you know that you can actually reuse your thick Chemex filters?
For more information, you can check out my guide on Chemex filtration.
There you can also find reviews of the best metal and cloth reusable alternatives to the original thick filters.
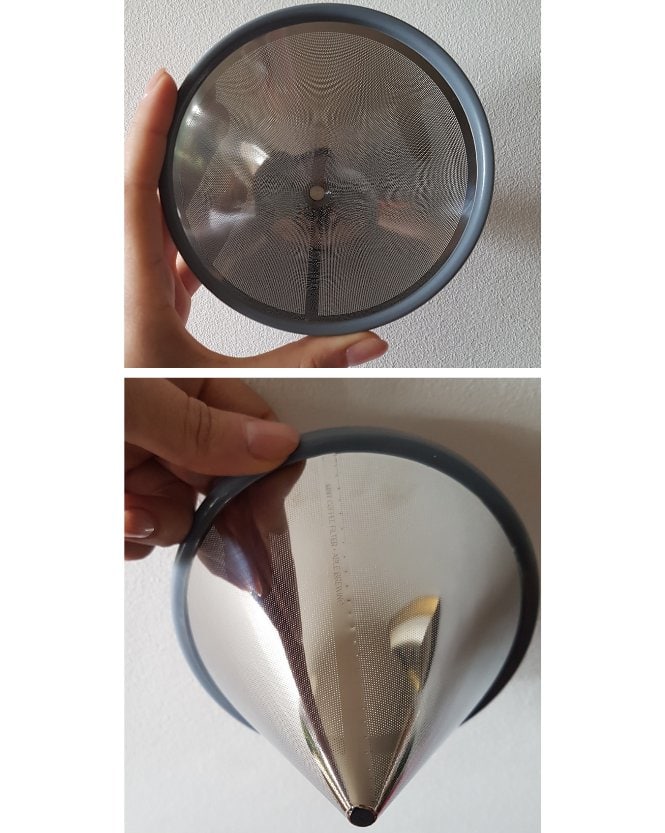
Using a Metal Filter with a Chemex
If you want to use your Chemex carafe with a metal filter, then you’re probably interested in making a fuller-bodied French-press-style brew.
Another reason why you may want to do that, is that you want a reusable, more eco-friendly filter alternative to the thick papers.
Metal filters let more coffee oils and result in coffee with a thicker texture.
Nevertheless, they let some tiny coffee particles pass through them, which may be unpleasant to some of you.
I have an Able Kone – a stainless steel reusable alternative that doesn’t let too much sediment in my brew.
Some people recommend using a coarser grind when making Chemex coffee with a metal filter, as this may reduce the amount of coffee silt that ends up in your cup.
Nevertheless, I wouldn’t recommend doing that, as a coarser grind may result in a fast drawdown and under-extraction.
I don’t think that you should make any grind adjustments to the aforementioned recommended grind size for Chemex.
Using a higher-quality grinder is better, as it will result in fewer coffee fines, without messing up your brewing cycle.
When using a metal filter with your Chemex, I recommend going for the same coffee-to-water ratio as the one I recommended at the beginning of this post.
So here’s how to use your Chemex coffee maker with a metal filter:
- Place the metal filter on your Chemex carafe.

- Rinse the metal filter with hot water. This way you will pre-heat the vessel.

- Discard the hot water.

- Add your coffee grounds to the filter.

- Shake the filter to even the coffee bed and create a well with your fingers.

- Pour enough off-the-boil water over the coffee grounds to saturate them and spin the slurry.

- Wait for 30 to 45 seconds for the coffee to bloom.

- Pour remaining water slowly and evenly throughout the grounds. Don’t be too aggressive to avoid channeling. You should’ve poured all the brew water over the grounds by the timer reads 2:00, but not before 1:45.

- Stir the grounds twice in opposite directions and gently swirl.
- Allow the coffee to drain through the filter.

- Remove the filter, throw away the grounds and rinse it. You can then enjoy your coffee!


If the coffee draws down too slowly, then there may be too many coffee fines that restrict the flow rate.
You may want to use a higher quality grinder, or grind slightly coarser to adjust the drawdown speed.
If the coffee drains too fast – then grind finer. You don’t want your coffee to turn out weak, with an unpleasant sour flavor as a result of under-extraction.
With that being said, I prefer making Chemex coffee with the original thick Chemex filters.
I like the clarity they provide, especially when brewing with light single-origin beans with floral or fruity flavor notes.
Final Words
I hope that you found this Chemex Brewing Guide helpful and that you now know how to use your pour-over device properly.
Feel free to share your thoughts in the comment section below.
For your convenience, I’ve also included a Chemex coffee recipe card, that you can use as basic guidance when you’ve already read the detailed instructions.
Chemex Coffee
By following this recipe you will find out how to use your Chemex coffee maker to make delicious coffee. For a complete brew guide and more tips, check out the full post.
Ingredients
- Ground Coffee - 30 grams (1.05 oz., around 3.5 to 4.5 rounded tablespoons) Medium-Coarse Grind
- Water - 500 grams (17.63 oz.)
Instructions
- Boil water in a kettle and let it settle while you continue with the following steps.
- Weigh your coffee dose and grind your beans. If you use pre-ground coffee and you don't own a scale, skip to the following step.
- Place the Chemex paper filter, so that the triple-layer side faces the pouring spout of the carafe.
- Rinse the filter with hot water and discard the rinse water.
- Add coffee grounds to the filter and shake the carafe to even the coffee bed.
- Create a well into the center of the grounds to make proper saturation easier.
- Pour a portion of the hot water over the grounds - just enough to saturate them. Before you start pouring zero out your coffee scale (if you're using one) and start a timer.
- Spin the coffee slurry and wait for 30 to 45 seconds for the coffee to "bloom".
- Pour the remaining water over the grounds. If the water reaches right below the rim of the carafe, wait for it to drain a bit. Then continue pouring water until you reach your target. You should've poured all the water by the time the timer reads 2:00, but not before 1:45.
- Stir twice in opposite directions and gently swirl.
- Allow the coffee to draw down.
- Remove the filter and enjoy your delicious Chemex brew!
Recommended Products
As an Amazon Associate and member of other affiliate programs, I earn from qualifying purchases.
-
 Chemex Pour-Over Glass Coffeemaker - Classic Series - 6-Cup - Exclusive Packaging
 -
TIMEMORE Coffee Scale, Espresso Scale ,Weigh Digital Coffee Scale with Timer,2000 Grams(Black)
-
TIMEMORE Chestnut C2 Manual Coffee Grinder Capacity 25g with CNC Stainless Steel Conical Burr - Internal Adjustable Setting,Double Bearing Positioning,French Press Coffee for Hand Grinder Gift
-
Gooseneck Kettle - Coffee Gator True Brew Coffee Kettle - New 2019 Model - Integrated Thermometer, Speedy-fill Lid - Professional Pour Over Kettle For Induction and all Stovetops - 54oz