If you own an AeroPress, then you probably know that there are many different recipes that you can follow to make a tasty cup of coffee.
But did you know that you can make cold brew with an AeroPress for only two minutes?
When I found out, I was skeptical that this fast coffee brewing method can produce a satisfying cup. After all, cold brewing always involves steeping the grounds for at least 7 hours. A long period of brewing is necessary to provide proper extraction by compensating for the low temperature of the water.
Nevertheless, Alan Adler, the inventor of AeroPress, claims that you can make a delicious cup of Joe with room temperature water quite fast.
Instead of a long steeping time, this recipe involves stirring the grounds in water for 1 minute. The produced agitation increases the speed of extraction. Furthermore, you should use finely ground coffee beans instead of the regular for cold brew medium or coarse grind. This increases the contact surface between the grounds and the water, which also contributes to a faster extraction.
In this post, I’ll share a guide on how to make cold brew coffee with an Aeropress, by following the original Alan Adler recipe. Then I’ll show you how to achieve even better results by using the inverted method. In the end, I’ll share my thoughts on this fast cold brew method and quickly review its advantages and disadvantages.
Without further ado, let’s dive in.
How to make fast cold brew in an AeroPress: Instructions
As I mentioned, to follow this AeroPress cold brew recipe, you need to use a fine, not regular cold brew grind.
I recommend using the same coffee grind you’d normally use when making coffee in an AeroPress. In the following photo, you can see the grind that I used for this recipe.
So here’s how to make AeroPress cold brew:
- Place the coffee filter in the filter cap and rinse it.
- Screw the filter cap onto the AeroPress and place it on top of a cup.
- Add one rounded AeroPress scoop to the brewing chamber.
- Shake the AeroPress to even out the coffee bed.
- Pour water to level 1 of the AeroPress.
- Stir for 1 minute.
- Place the plunger into the AeroPress and push down. Your cold brew concentrate is now ready.
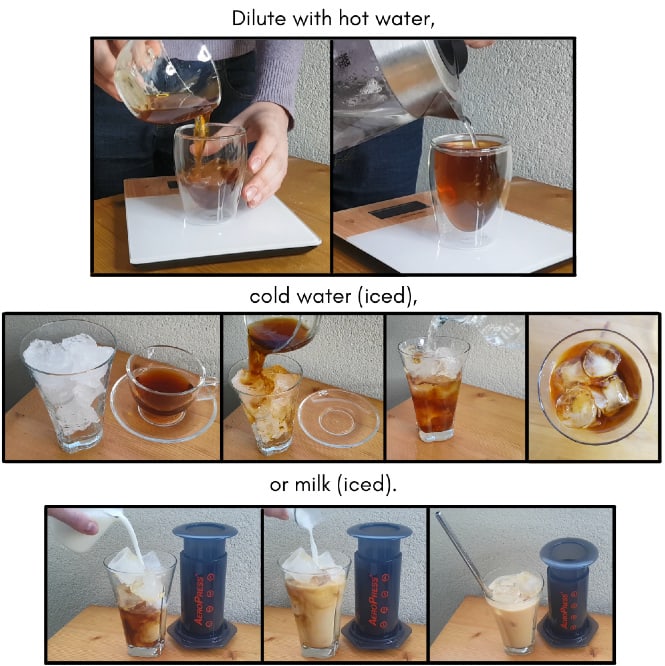
You can dilute the yield with cold water, hot water, milk, or in other words, customize it according to your personal preference.
I’ve also tried making this recipe by using a metal AeroPress filter by Able.
The results were similar, but I liked the taste of the cold brew coffee made with a paper filter better.
Anyway, while testing I found that 1 rounded AeroPress scoop of ground coffee weighs between 14 and 17 grams (0.49 to 0.59 ounces). When following Alan Adler’s recipe I was adding 80 milliliters of water. The yield varied between 67 milliliters (2.27 fl. oz.) and 73 milliliters (2.47 fl. oz.), which is perfect, as after diluting you end up with an ideal serving of cold brew coffee.
Making AeroPress Cold Brew: the Inverted Method
I highly recommend using the inverted method when making a fast cold brew in an AeroPress.

I didn’t like the fact that while I was stirring for a whole minute the coffee was prematurely dripping into my cup.
By using the inverted method, I wasn’t worried about dripping coffee before pressing the plunger. This also gave me the opportunity to make adjustments to the recipe by playing around with the stirring time. I found that a minute and a half of stirring provides better results.
I used 18 grams (0.63 ounces) of ground coffee and 90 milliliters (3.04 fl. oz) of water (1:5 ratio), which produced 73 milliliters (2.47 fl. oz.) of cold brew.
So here’s how I recommend making fast cold brew in an inverted AeroPress:
- Rinse the paper filter and put it aside.
- Add 18 grams (0.63 ounces) of ground coffee into the AeroPress.
- Add 90 milliliters (3.04 fl.oz.) of water. I don’t recommend using tap water. Stick to filtered or bottled water, as you can’t make good coffee with bad water.
- Stir for 1 minute and 30 seconds.
- Screw the filter cap onto the AeroPress.
- Place the cup on top of the filter cap and while holding it, swiftly turn the AeroPress upside down.
- Press the plunger down.
If you don’t have a scale for coffee, and you can’t measure the proportions, you can still take advantage of my recommendation to use the inverted method and stir for a bit longer.
AeroPress Cold Brew – My Review
To be honest, I wasn’t expecting this fast cold brew AeroPress method to produce a tasty cup of coffee.
Nevertheless, I was quite happy with the flavor. Even though this two-minute cold brew recipe didn’t extract all the good stuff out of my beans, as hot water would, my coffee still had a satisfying taste and strength. The AeroPress cold brew, even before dilution, had a thin body and appeared much lighter in color compared to regular cold brew concentrate. With that being said, I wouldn’t call it unpleasantly bland. Quite the contrary – the flavor was surprisingly satisfying.
If caffeine is your concern, by following this recipe, you’ll definitely get a caffeinated cup of Joe. Because I was experimenting with different ratios and methods of preparation, I had two cups in a row, which made me jittery.
If you’re aiming for a complex flavor profile, the AeroPress cold brew isn’t the way to go. The better option would be to make an iced coffee by utilizing the Japanese method, which involves brewing with hot water over ice cubes.
On the other hand, if you want a quick and cup of decent coffee with lower perceived acidity, go for it. This AeroPress cold brew recipe is also ideal for those who travel and often don’t have access to hot water. By following this guide, you’ll get to have a flavorful cup no matter where you are.
Furthermore, if you’re used to having your coffee with creamer, milk, sweeteners, or some other condiments, you will be more than happy with how your two-minutes cold brew turns out. I prepared a serving for a friend of mine by diluting the concentrate with water, adding a splash of heavy cream, and a tablespoon of Vanilla Syrup by Monin.
She loved how it turned out and said it was much better than her regular Starbucks drink.
So I’d definitely recommend following my instructions and making a quick cup of cold brew with your AeroPress. It’s something that you should experiment with at least once. Leave me a comment below to share how it turned out.
AeroPress Fast Cold Brew

Find out how to make tasty cold brew concentrate with an AeroPress in only 2 minutes.
Ingredients
- 1 rounded AeroPress scoop of finely ground coffee (14 to 17 grams, 0.49 to 0.59 ounces)*
- Room temperature water to level 1 of the AeroPress (around 80 milliliters, 2.7 fl. oz.)*
Instructions
- Put the coffee filter into the filter cap and rinse it.
- Attach the filter cap to the AeroPress.
- Place the AeroPress on top of a cup.
- Add one rounded AeroPress scoop of finely ground coffee into the AeroPress.
- Even out the coffee bed by shaking the brewing chamber of the device.
- Pour water to level 1.
- Stir the mixture of coffee grounds and water for one minute.
- Put the plunger in the AeroPress and push it down. You will get 67 milliliters to 73 milliliters of cold brew concentrate.
- Dilute the yield with cold water, or milk and serve over ice cubes, or with hot water, in case you want to enjoy your drink hot.
Notes
*When I make fast cold brew at home, I use 18 grams (0.63 ounces) of ground beans and 90 milliliters, 3 fl. oz. of water. I found that I achieve better-tasting cold brew coffee when I use the inverted AeroPress method, and stir for a minute and a half instead of stirring for only a minute.
*Don't use tap water, stick to filtered or bottled. Good coffee is always made with good water.
Recommended Products
As an Amazon Associate and member of other affiliate programs, I earn from qualifying purchases.


