
The Moka Pot is an affordable stovetop coffee maker, through the use of which you can make rich and strong coffee at home. It’s invented in 1933 by Alfonso Bialetti, an Italian engineer. To this day, these coffee brewers are very popular around the world, especially in Italy, where virtually every household owns and uses Bialetti’s invention.
In this guide, I’ll teach you how to properly use a Moka pot to make tasty homemade coffee.
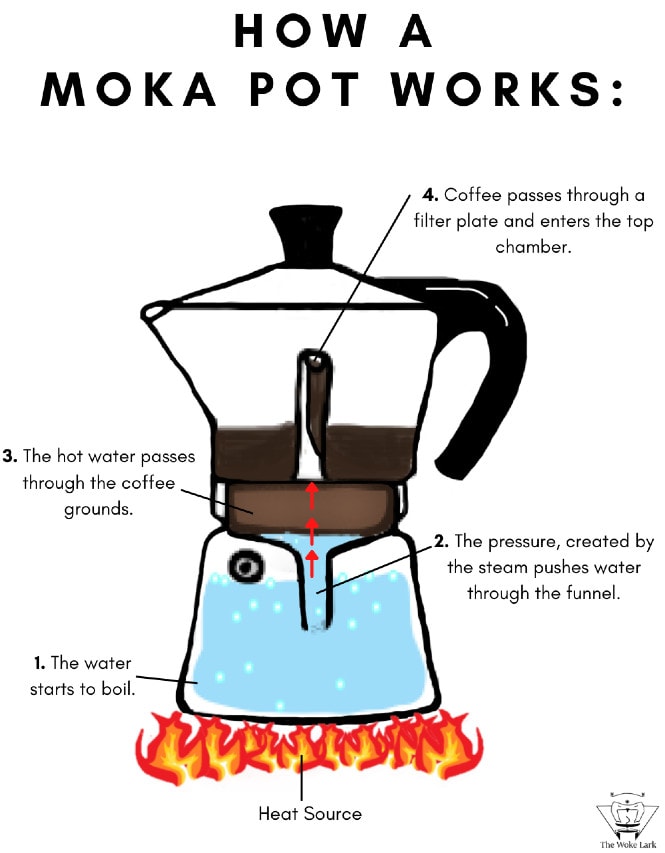
Before we start, here’s an illustration of how a Moka pot works:
Actually, because of its high concentration, the Moka pot brew is the best alternative to espresso for homemade lattes, cappuccinos, and mochas. Many Italians even call Moka pot coffee “espresso”.
So if you’re looking for a way to make a delicious latte without an espresso machine at home, you’ll definitely find my guide useful.
Nonetheless, Moka pot coffee and espresso aren’t the same. According to this scientific report, when it comes to caffeine content, espresso contains 1.66 times the amount of caffeine compared to coffee, brewed in a Moka pot.
In comparison, a cup of coffee, brewed in an Aeropress is more than 2 times less concentrated than coffee from a stovetop pot.
So you can, in fact, get a strong, espresso-flavored coffee from Bialetti’s stovetop coffee maker. And there’s no other coffee brewing device that does it quite as well.
With that being said, let’s move on to the recipe instructions.
How to Properly Use a Moka Pot: Instructions
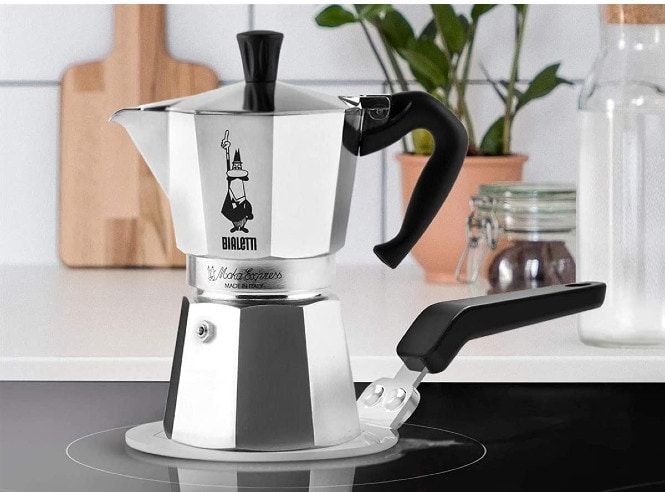
For this Moka pot brewing guide, I’ll use my 6-cup induction-friendly stovetop coffee maker by Bialetti.

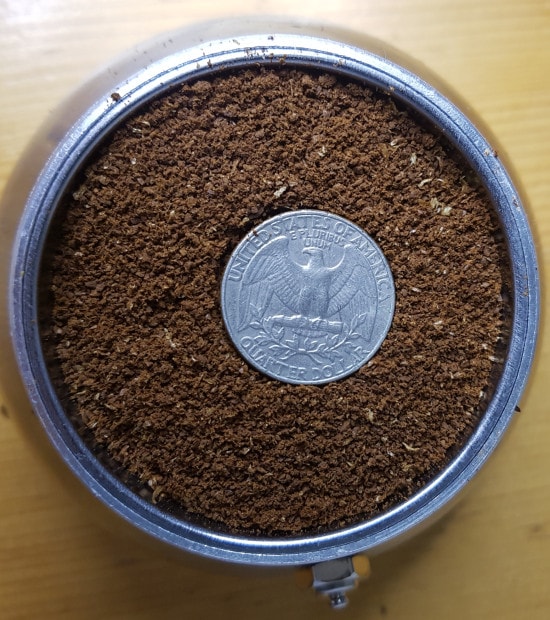
When it comes to the grind size for Moka pot, I recommend using fine grind, but a bit coarser than what you’d normally use for espresso. In the following photo, you can see the coffee grind I use with my stovetop coffee maker.
When it comes to the coffee roast, I don’t usually go for dark roasts when making coffee in a Moka pot. Because of the way they work, stovetop coffee makers tend to extract bitter coffee compounds. The bitter flavors are even more pronounced if you use darkly roasted coffee. So I recommend using a medium roast when brewing coffee in a Moka pot.
Now that we have these clarifications out of our way, here’s how to use your Moka pot to make tasty coffee at home:
1. Boil water in a kettle and fill the bottom chamber of your Moka pot.

To make tasty coffee in a Moka pot, I recommend filling the bottom section of the brewer with pre-heated water.
If you use room-temperature water, the pot will stay on the heat for longer.
This means that the ground coffee will get too hot even before the water starts boiling.
The overheating of the coffee grounds results in an unpleasant burnt flavor and makes the final brew even more bitter.
Therefore, I recommend using hot water to start with.
I should also point out that if you’re trying to make delicious coffee in a Moka pot, you should use filtered or bottled, not tap water. To be fair, no matter what brewing device you use, you can’t get a great cup of Joe if you don’t use water that you enjoy having on its own.
Another thing to keep in mind is that you should fill the bottom chamber of the Moka pot without covering its safety valve.
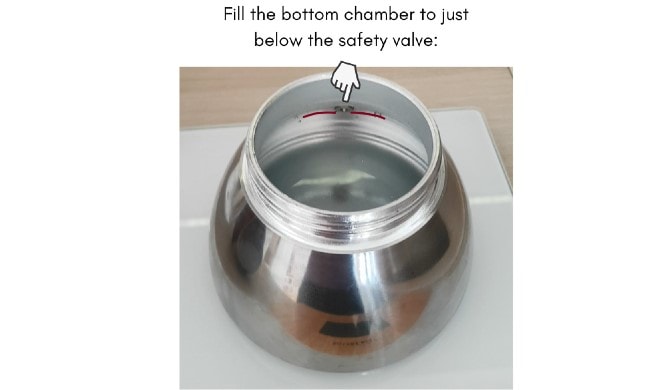
This is essential, as if you fill the lower chamber with too much water, the safety valve won’t work properly. This leads to the accumulation of too much pressure, which may even make your Moka pot explode.
2. Add ground coffee to the coffee basket.

You can also shake the funnel to level out the coffee bed.

Once you do that, you can place the coffee basket onto the bottom chamber.

3. Screw the top section onto the bottom chamber.

Make sure your Moka pot is properly sealed. In case it seems to you that it doesn’t seal tightly, turn the upper chamber upside down and check out whether the circular rubber gasket is clean.

Sometimes, coffee grounds get stuck onto the rubber gasket and the filter plate, which prevents proper sealing.
4. Put the Moka pot on medium heat and wait for the coffee to start appearing in the top chamber.

Once you leave the Moka pot on the stovetop, it should take from 5 to 10 minutes for your coffee to be ready.
Once you hear a gurgling sound, it’s time for you to remove your brewer from the heat.
This sound indicates that most of the water from the bottom chamber has already gone through the funnel into the upper section of your Moka pot.
Leaving the stovetop coffee maker on the heat for too long will have a negative impact on the flavor of your brew.
5. Remove the Moka Pot from the cooktop and run its base under cold water.
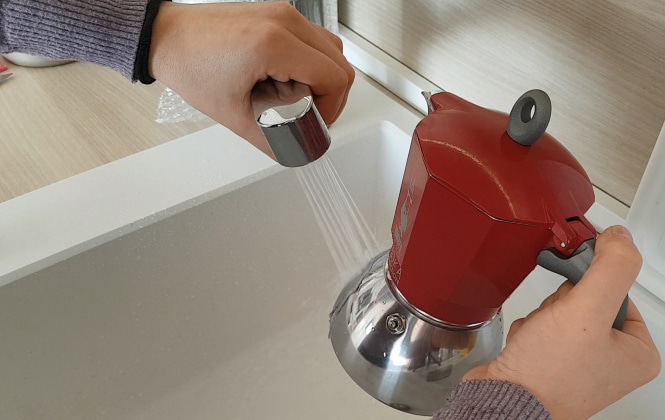
Instead of doing that, you could place the hot Moka pot in a bowl, filled with iced water.
I find running the base under the tap easier. This stops the brewing process and results in a more balanced cup of coffee.

Related Post: How to Clean a Moka Pot: Step-by-Step Guide
Moka Pot Coffee to Water Ratio & Yield
Stovetop coffee makers use a high coffee to water ratio.
My 6-cup Moka pot bottom chamber holds around 10.14 fl. oz. or 300 milliliters of water. The filter basket, if filled to the top, holds 1.05 ounces or 30 grams of ground coffee.
This means that the Moka pot coffee to water ratio is 1:10. If you don’t fill the filter basket to its maximum capacity, the coffee to water ratio would be 1:13. This, along with the fact that this type of stovetop brewer uses finely ground coffee and boiling water, results in a very strong brew.
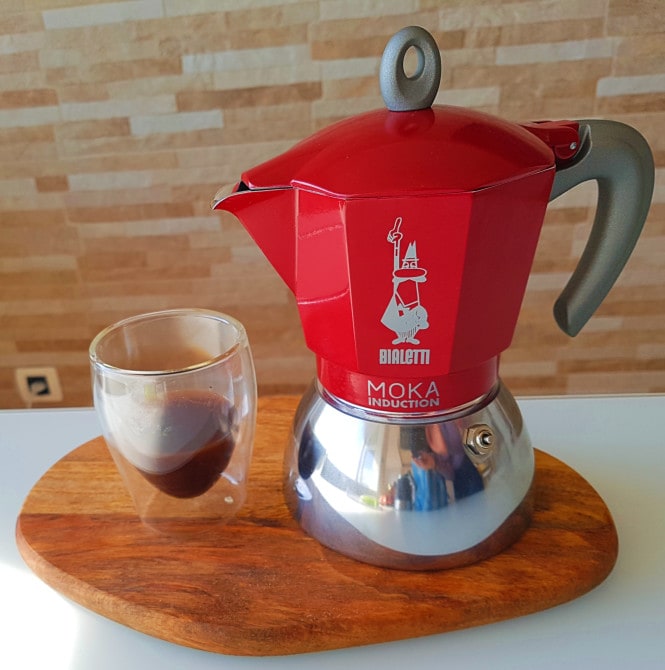
The yield I get from my 6-cup Moka pot is usually around 260-270 grams or 9.2 to 9.5 ounces. This equals 3 to 5 coffee cups, depending on the serving size you prefer.
Moka Pot on an Induction Stove: What are your options
Most stovetop coffee pots are made of aluminum and you can easily use them on gas and electric cooktops.
Nevertheless, aluminum Moka pots won’t work on an induction stove, which is why I bought Bialetti’s stovetop maker for induction, which has a stainless steel bottom chamber. If you have an induction cooktop, you could also get a Bialetti Venus Stainless Steel Coffee Maker.
There are actually ways to make your aluminum Bialetti work on an induction stovetop.
The first one would be to use a stainless steel diffuser plate.
Nonetheless, you should remove it right after the brew is ready, as leaving the plate for longer may damage the glass of your induction cooktop.
The other way of making an aluminum stovetop coffee maker work on induction is to place your Moka pot on a cast iron pan. Many people have tried that and it works perfectly fine.
Final Words
I hope that you found my Moka pot brew guide useful. Now that you know how to properly use your stovetop coffee maker, you can easily make improvements to your homemade coffee.
Leave me a comment below to share your thoughts, or ask me a question regarding my Moka Pot coffee how-to guide.
If you’re interested, you can also check out the following coffee brewing guides:
- How to make Cold brew coffee
- AeroPress Fast Cold Brew Guide
- How to make coffee in a French Press
- How to use a Chemex coffee maker
You can also use your flavorful Moka pot coffee instead of espresso in latte and mocha coffee recipes, such as the following ones:
- Honey Vanilla Cinnamon Latte Recipe
- How to make a Dark Chocolate Mocha at home
- White Chocolate Mocha Coffee Recipe
How to Use a Moka Pot
Find out how to use a stovetop coffee maker to prepare a flavorful cup of coffee at home. By following this how-to guide, you'll improve the taste of your brew and learn how to properly make Moka pot coffee.
Materials
- Moka pot (stovetop coffee maker)
- Hot water
- Coffee Grounds - a fine grind, but a bit coarser than espresso
Instructions
- Pour hot water to just below the safety valve of the bottom chamber of the Moka pot. You shouldn't cover the safety valve with water!
- Add ground coffee to the coffee basket.
- Place the coffee basket onto the bottom chamber.
- Screw the top section of the Moka pot onto the bottom chamber.
- Place the Moka pot on medium heat and wait for the coffee to start appearing in the top chamber.
- Once you hear a gurgling sound, remove the Moka pot from the heat and run its base under cold water.
I have been looking for info on using a moka pot as I am considering one for morning lattes. Thank you for an in-depth review. As I am concerned about aluminum leaching from said pot, does stainless steel give the same results?
Hey Linda
Yes, stainless steel moka pot coffee makers are just as good at making a nice cup of strong coffee with intense flavor. The Bialetti Venus stainless steel unit that I linked to at the beginning of this article is a great product. It’s made of stainless steel, except for the handle, but there’s no aluminum that comes in contact with the hot water. You can check out my blog post on the best plastic-free coffee makers, where you can find other suggestions on products that have no plastic or aluminum.
I hope my answer was helpful!
It would be helpful to include info on how many Tablespoons of coffee to use, or how many Tablespoons equal the suggested grams or ounces of coffee to use. Granted, serious coffee heads have a scale, but what about the rest of us, you know, those of us who require an article like this.