
This forgiving coffee-making device makes it easy for anyone to prepare a great cup of Joe at home.
In my complete AeroPress brewing guide, you will find everything you need to know – from grind size and coffee ratio to simple step-by-step instructions.
We’ll go over the regular and the inverted (upside-down) method to see why some people prefer one over the other.
I’ll also help you understand how to improve your coffee’s flavor by adjusting the water temperature, steeping time, and grind size.
No matter if you’re a beginner or an advanced coffee lover, I’m sure that here you will find useful AeroPress tips that will help you improve your brew.
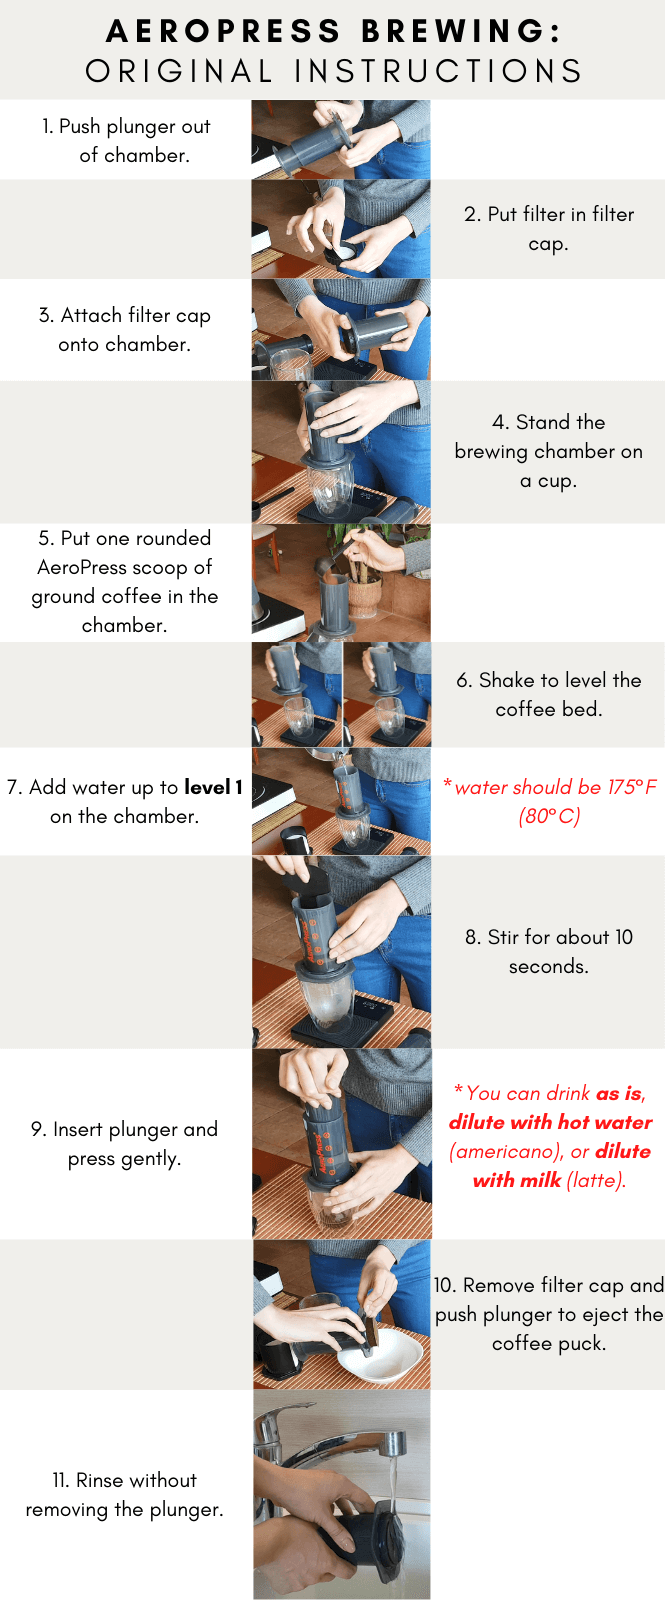
Of course, before we start, here’s an illustration of how to use your AeroPress according to the original instructions that come with each device:
You can also check out my detailed post on how to make fast cold brew coffee with your AeroPress.
You can always follow the original guide to make a decent cup.
Nevertheless, by implementing my AeroPress tips, you can easily step up your brewing game.
AeroPress Ratio
According to the original AeroPress instructions, you should use one rounded scoop of ground coffee to prepare a cup.
During testing, I found that a rounded AeroPress scoop holds between 14.5 to 15.5 grams of ground coffee on average.
It matters whether you weigh your beans whole or ground. A rounded AeroPress scoop of whole coffee beans holds from 16 to 19 grams.

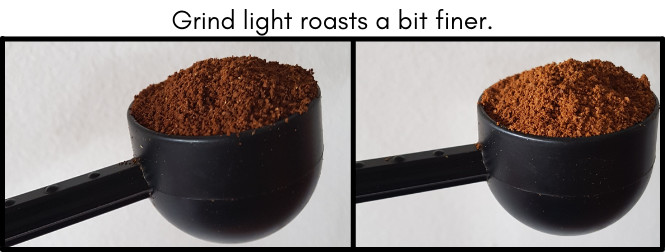
It’s also worth noting that lighter roasts weigh more for the same volume compared to darker roasts.

By pouring water on top of the grounds to level one, you will be adding around 60 milliliters to 70 milliliters of hot water.
This means that the original AeroPress recipe calls for a pretty high coffee-to-water ratio – around 1:4.
This ratio is even higher than the one I use to make cold brew coffee concentrate at home.
For my AeroPress recipe I recommend using a lower ratio – 12 grams of coffee to 200 grams of water. If I go for a darker roast, I’d normally up the coffee dose a bit and use 14 grams of ground coffee to 200 grams of water.
If you want to get consistently excellent results when preparing your cup, you need a coffee scale.
It will provide the needed precision.
You can check out my post on the best scales for coffee where I review the top products in this category.
At home, I use a Timemore Black Mirror digital scale, and I’m more than happy with its performance, especially considering its price.
What is the right grind for AeroPress?
To make coffee in your AeroPress, it’s best to use a medium-fine grind.
It should be finer than the one you’d normally use for drip coffee, but coarser than espresso-fine grind.
Here’s a photo of the ground coffee I used with my AeroPress for one of the recipes in this brewing guide:

Of course, if I am to use a light roast, I’d grind a bit finer as this will help me add the desired complexity to my cup.
I’d usually start with 12 clicks on my Timemore Chestnut C2 grinder for light roasts, and 13 clicks for dark roasts.
It’s worth noting that it’s impossible to pinpoint an ideal grind for any coffee brewing device.
If it seems like the coffee is too sour, grind a bit finer.
If it’s too bitter – a bit coarser.
If your cup seems dull and lacking flavor, you might’ve ground too coarse.
You can compensate for the coarser grind by stirring the slurry, as the agitation will improve extraction.
Contrarily, if the flavors are all over the place and unbalanced, you may want to grind a bit coarser.
Freshly home-ground coffee is always better than pre-ground. If you don’t own a grinder, your second best option is to go to the coffee shop nearby.
There you can ask the barista to grind some freshly roasted coffee for AeroPress brewing.
Making Coffee in an AeroPress: Brewing Guide Instructions
There are many AeroPress recipes that you can choose from.
In this brew guide, you will find easy-to-follow directions, that will let you enjoy a well-balanced and flavorful cup of coffee.
So here are the step-by-step AeroPress brewing guide instructions:
1. Prepare your AeroPress.

This means that you should do the following:
- Remove the plunger.
- Place the filter into the filter cap.
- Screw the filter cap onto the brewing chamber.
- Place the brewing chamber onto a cup.
Some passionate coffee lovers insist that you should rinse the AeroPress filter with hot water before you add the coffee grounds.
They believe that this will remove the paper taste and pre-heat the brewing vessel, which results in a better coffee flavor.
During testing, I found that rinsing and pre-heating don’t really make a difference in the quality of my brew.
Other pour-over coffee-making devices use filters that are much thicker. For example, in my Chemex brewing guide, I highly recommend rinsing the filter, as if you don’t do so, you’ll definitely get those papery notes in your cup.
Even James Hoffmann, who’s an authority in the coffee world, shares that he doesn’t think rinsing is necessary when making coffee with these thin AeroPress papers. You can check out his thoughts in his video on “Understanding the AeroPress”.
It’s also worth noting is that if you use a scale you should zero it out after you place the cup and the brewing chamber onto it.
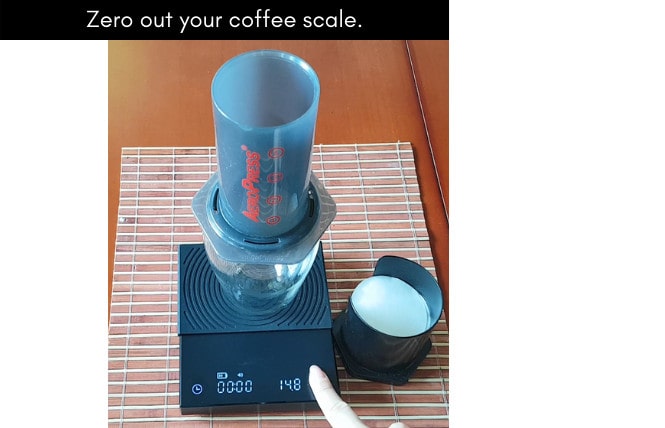
I know it’s an obvious step, but I sometimes forget to do that and it’s quite annoying when it happens…
2. Add coffee grounds.

As previously mentioned, start with 12 grams (0.42 ounces) if you’re using a light roast and 14 grams (0.5 ounces) if you’re using a dark roast.
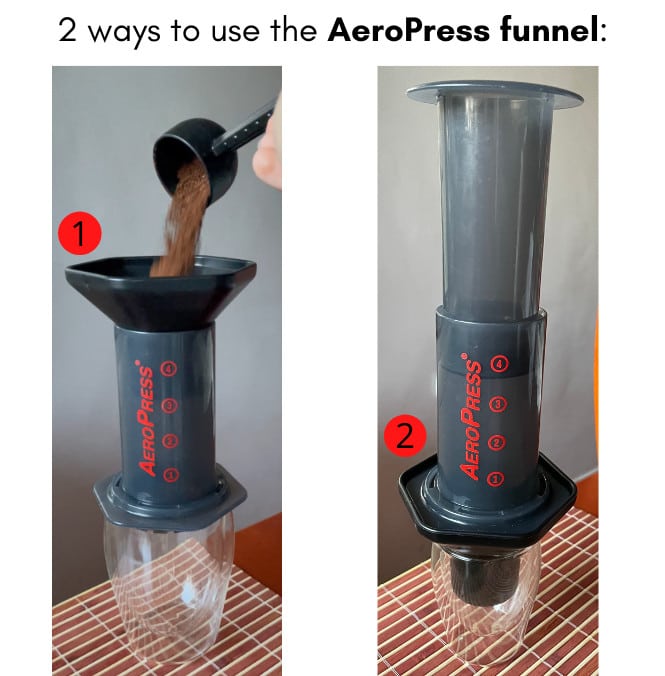
If you find it more convenient, you can place the AeroPress funnel on top of the brewing chamber to make the loading of coffee grounds less messy.
If the diameter of the cup you want to brew into is too small for your AeroPress, you can use the funnel for a different purpose. It will make it possible for you to press into a smaller cup.
3. Saturate the grounds with hot water.

When it comes to the AeroPress water temperature, Alan Adler recommends using 175°F (80°C) water.
If you don’t have a kettle with a thermometer and you brew with lighter roasts, you can pretty much use off-the-boil water. If you make dark roasted coffee, boil some water and let it rest for a minute or so until the temperature drops a bit more.
Using water that’s too hot with dark roasts results in over-extraction, which leads to bitter and harsh flavors.
A kettle with a thermometer, or an electric one with variable temperature control settings, provides great precision and makes it easier to achieve consistently good results with how your coffee turns out.
You can check out this kettle buyer guide where I review my top picks in this product category.
If you think that you’ve ground your coffee a bit too coarse, you can gently stir or swirl the AeroPress. The agitation will improve the extraction and compensate for the coarser grind.
I don’t usually add agitation to my brewing cycle and simply continue with the following step.
4. Place the plunger in the base to avoid drip through while steeping.

This way you create a vacuum and the coffee prevents premature drip through into your cup.
5. Let the coffee steep for 2 minutes.

2 minutes are sufficient to extract the desired flavors out of your ground coffee beans.
With that being said, I’d sometimes wait for my AeroPress coffee to brew for a bit longer – 2 and a half or 3 minutes.
I’d usually do so when I use single-origin lightly roasted coffee beans with a complex flavor profile.
Increasing the steeping time and using a higher water temperature ensures the extraction of the subtle flavors.
6. Press the AeroPress plunger gently.

Before you press you may want to swirl the AeroPress. This way you will make the coffee grounds that have formed a crust on the top sink to the bottom, and make it somewhat easier to press.
7. Clean your AeroPress and enjoy your coffee.
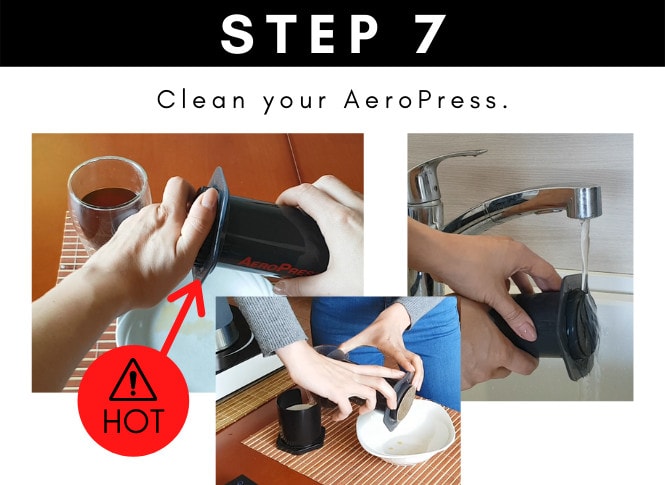
Make sure you are cautious when you remove the filter cap, as if you do it right after you’ve pressed, you may burn your fingers.
After you do that you can enjoy your freshly brewed AeroPress coffee.
The Inverted AeroPress Method

The Inverted AeroPress method is also known as the upside-down or reverse method.
Many people prefer it mainly because it doesn’t allow for any coffee to drip through the filter before you press the plunger.
With the original non-inverted technique, the coffee drains prematurely at an even higher pace when you stir the slurry inside the AeroPress brewing chamber.
Therefore the inverted method is often chosen by those who always add agitation to their brew process.

You should also keep in mind that you should always pre-wet the filter in the filter cap with the inverted method.
This way the paper disc will stick to the cap and you can easily screw it onto the brewing chamber without the filter falling.
Anyway, I’d normally go for the original method when I use my AeroPress.
Placing the plunger inside to create a vacuum while steeping works well enough to prevent premature draining.
It’s also not as convenient to use the bypass AeroPress method (brew two cups at a time) with the upside-down technique. In this position, the brewing chamber has a slightly lower capacity and I can’t seem to fit as much water as I wish.
With that being said, many participants in the world AeroPress championship use the inverted method.
If you’re handy and you feel like it matches your needs and brewing technique better, you can go for the reverse AeroPress brewing.
On the other hand, if your main concern is the premature drip through the filter, you can get the Fellow Prismo attachment.
You can use it instead of your filter cap and you won’t have to worry about draining before you press. You can check out its full review in my guide on the best AeroPress filters and alternatives.
In the said guide you can also find out what’s the difference between the paper and the reusable metal AeroPress filters.
Final Words
I hope that you found my AeroPress brewing guide helpful.
Here’s a recipe card that summarizes my recommendations:
Aeropress Coffee
By following this recipe, you will get to have flavorful coffee, made in an AeroPress at home
Ingredients
- Medium-fine ground coffee - 12 grams (0.42 oz.) (light roast), 14 grams (0.5 oz.) (dark roast)
- Hot Water - 200 ml. (6.76 oz.) (off-the-boil - light roast, 175°F to 185°F (80°C to 85°C) - dark roast
Instructions
- Remove AeroPress plunger.
- Place filter in filter cap.
- Screw filter cap onto the brewing chamber.
- Place the AeroPress onto a cup or carafe.
- Add ground coffee into the brewing chamber.
- Saturate the grounds with hot water.
- Put the plunger into the brewing chamber, but not all the way through. Just so it creates a vacuum to avoid drip through the filter before pressing.
- Wait for two minutes for the coffee to steep.
- Swirl the AeroPress.
- Gently press the plunger down.
Recommended Products
As an Amazon Associate and member of other affiliate programs, I earn from qualifying purchases.


I made sure to include easy-to-follow instructions that will make it possible for virtually anyone to make a flavorful cup of coffee.
If you’re a beginner you can follow my directions precisely, but in time you will find that you can make small adjustments that will yield even better results.
You can always take advantage of my AeroPress brewing tips to make a nice and balanced cup of coffee that doesn’t need any condiments.
Leave me a comment below if you have any questions!