Updated: March, 2023
I guess you’re ready to step up your brewing game; or you’re just looking for a way to prepare a good cup of Joe at home, without spending too much on an expensive coffee machine.
It doesn’t matter why you need this comparison, after reading this article you’ll be confident in deciding which one wins the AeroPress vs. pour-over coffee battle.
Click for Quick Navigation:
It’s worth exploring the differences between the devices, especially if you’re wondering whether to have your homemade cup, made by using one or the other.
This is why I’ll answer some important questions that you may be asking yourself:
Is pour-over truly better than AeroPress?
Or it all comes down to personal preference?
If so, how does an AeroPress coffee compare to a pour-over cup made with, say, a Chemex or a V60?
Do you need to buy additional equipment?
Are the AeroPress instructions easier to follow?
Let’s stop wasting any more time and get straight to the point!
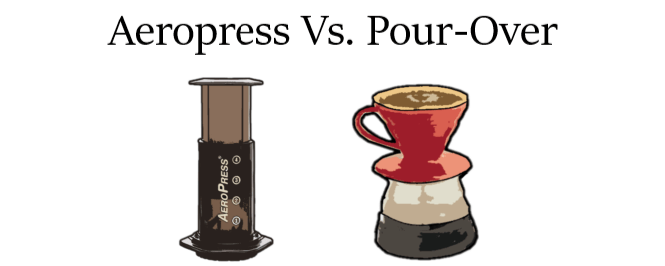
Aeropress Versus Pour-Over Comparison Overview
For those of you who are in a hurry and want to quickly choose between an AeroPress or a pour-over device, I’ll summarize the basics in a short paragraph.
After that, I will do a detailed comparison of their main characteristics and performance, for those of you who are interested in going more in-depth.
That being said, here is what you should know when comparing an AeroPress vs. a pour-over coffee brewing device:
- Generally a cup of coffee made with an AeroPress is fuller-bodied than one made with a pour-over brewer.
Therefore if you prefer a clean and light-bodied type of brew with thinner texture, go for a pour-over device such as a V60 or a Chemex.
If you prefer a fuller-bodied and smooth cup that is still free of coffee silt, an AeroPress would be a sound choice. - The AeroPress is the more beginner-friendly option compared to a pour-over device, as it provides more consistent results.
You can be more flexible with its recipe and it will be hard to truly mess up, whereas with a pour-over brewer you have to be more precise. - Pour-over brewing is more time consuming compared to AeroPress brewing.
If you are somewhat impatient when it comes to preparing your coffee, go for an AeroPress. - If you want to brew more than 2 cups at a time, a pour-over device is generally considered to be a better alternative to the AeroPress.
The latter can only hold up to 8 fl. oz. (240 ml) of water. - Pour-over brewing usually requires more additional equipment than AeroPress, which means that your initial investment will be higher.
To achieve the desired results you need a gooseneck kettle, a scale, a grinder, which in combination with your brewing technique will yield the coffee of your dreams.
Since the AeroPress device is more forgiving, you don’t need all this additional equipment to end up with a good-enough cup. - The AeroPress is free of BPA, but if you’re trying to avoid using plastic in your kitchen, go for a plastic-free pour-over device.
A Chemex, a ceramic Melitta, a Hario V60, or a Kalita are all good solutions that are free of plastic. - The AeroPress coffee maker is the better option if you travel often – it’s easier to carry around.
It’s sturdy and hard to break, and at the same time – light. You can throw it in your suitcase or your backpack and have a great brewer wherever you go.
Now that we’ve covered the basics, let’s explore their differences further.
Detailed Discussion of Their Differences
First, we need to briefly discuss what an AeroPress is and how it works:

Click here to see the current price and more photos on Amazon.
An AeroPress is a manual brewer that functions similarly to a syringe – you push a plunger to inject the coffee into your mug.
It uses the full-immersion brewing method, as it involves soaking the grounds, fully submerged in water.
You addd the coffee grounds to the brewing chamber, add water, let the grounds soak for a minute or so, and then you press down the plunger.
The coffee gets forced through a paper filter and a plastic perforated cap and enters your cup.
There are two common ways of using the AeroPress – the standard and the inverted method.
When it comes to recipes – there are dozens.
You can make fast 2-minutes cold brew coffee in an AeroPress, or even use its funnel to turn it into a cold drip coffee tower.
This is why it’s perfect for beginners.
And now, let’s take a look at what a pour-over brewing device is:

Click here to check out this red Hario V60 pour-over dripper listed on Amazon.
Related Post: Hario V60 Recipe: Step-by-step Brew Guide & Tips
Pour-over brewing actually consists of pouring hot water over your ground beans and through a filter.
The extraction happens while the water passes through the grounds.
The extraction quality is of great importance and strongly depends on the way you pour in the water.
This is why the pour-over brewing method requires a higher level of technique.
All the other variables are also very important throughout the length of a brew cycle. These include grind size, grind consistency, water temperature, etc.
Even though it’s tricky to initially dial in, once you figure out the whole process, you will get to enjoy a great cup of coffee day after day with the pour-over method.
Nevertheless, it’s worth noting that some pour-over brewing devices require a higher level of technique than others.
The Chemex and the V60 are more pretentious than the Melitta, Beehouse, or the Walküre.
It’s still safe to say that overall the full immersion AeroPress method is much more forgiving and provides more consistent results.
Coffee Characteristics
As I already mentioned, a pour-over brewing device will produce a clean, lighter-bodied cup versus the more intense and fuller-bodied AeroPress coffee.
The AeroPress brew is often described as a mixture of pour-over and French press.
This is so, because of its thin and light circle paper filters that don’t trap much of the coffee oils.
This results in a fuller-bodied coffee compared to the coffee, made with thicker pour-over filters.
At the same time, the AeroPress paper circles don’t let coffee sediment pass through them, which results in a cleaner cup, compared to a French Press cup.
Actually, many people who have been using the French press often upgrade to an AeroPress.
Here you can see the comparison between the two:
If you’re currently using a French press and you’re starting to feel like your coffee tastes a bit heavier than what you’d like it to be, the AeroPress is a great alternative.
There won’t be that much coffee sediment in your cup compared to a French press, but you’ll still be able to get that rich cup of Joe you enjoy.
The fact that the AeroPress coffee also goes through a paper filter makes the use of a finer grind possible.
That’s why you can steep for a shorter period compared to when using a French press.
This means that you can prepare a flavorful cup of coffee faster.
It’s also worth noting that the AeroPress plunger provides more even pressure because during the filtration you’re pushing the water through the grounds with a layer of air, not the plunger itself.
Related Posts:
- How to make coffee in a French Press: Guide.
- Best French Press Coffee Makers Reviewed.
- Cold Brew in a French Press – How-to Guide.
Still, the way your AeroPress coffee turns out really depends on the recipe you use.
All the variables (how long you steep for, how fine you’ve ground your coffee beans, how intensely you’re pressing the plunger, do you stir the slurry or not, what’s the water temperature you use, etc.) have an impact on the final brew. The same applies to pour-over coffee.
With that being said, the basic differences in the coffee characteristics that I pointed out can make it easier for you to decide whether AeroPress or pour-over coffee matches your taste better.
Related Post: AeroPress Step-By-Step Brewing Guide With Photos
How Long Does It Take to Brew?
Generally, the grind size required for a pour-over brewing device is coarser compared to the one needed for an AeroPress.
This means that the pour-over extraction would take longer.
It also requires your participation throughout the whole brewing cycle, unlike with other full immersion devices, such as the French press or AeroPress.
Roughly, making a cup of AeroPress coffee would take around 2 minutes, while with a, say, Chemex the brewing process itself would take around 4 minutes for a 16 – 17 fl. oz. (500 ml) brew.
Related Post: Chemex Brew Guide
Filters

If you want to achieve an even bolder flavor and a heavier mouthfeel with your AeroPress maker, go for a metal filter that would let more of the coffee oils into your cup.

The Fine Able Stainless Steel filter is the one that I own and occasionally use. I’m quite happy with it.
When it comes to the AeroPress paper filters – have in mind that you can reuse them as well.
Just rinse the used one and let it dry. So if you make 2-3 cups of AeroPress coffee per day, you can easily use the same paper filter for all of them.
It’s probably important to some of you that there aren’t brown AeroPress filters.
Nevertheless, there are other brands that offer unbleached paper disks that fit the AeroPress, such as these ones by Outus.
In case you prefer natural ones you may also make your own, by cutting other unbleached alternatives to size.
There I also review the best reusable alternatives to the original papers.
On the other hand, if you opt for a pour-over brewer, there are many brown paper alternatives that you can choose from.
Filters play the most important role in pour-over brewing.
They trap the coffee fines and oils, which results in what a coffee snob would call a cleaner, crisper cup.
At the same time, if done properly, the pour-over brewing process ensures proper extraction and you will get a complex cup that lets you experience the intrinsic flavor profile of the beans you use.
Still, if you prefer this type of brew or you’re looking for a way to lower the acidity of your coffee, go for a pour-over device that works with thick paper filters, such as the Chemex.
I have a whole article on Chemex filters and their reusable alternatives, where you can find a detailed guide on what type of coffee you’ll get by using different coffee filter options.
On the other hand, there are permanent pour-over filters that let more of the coffee oils into your cup.
For example, some pour-over devices use cloth filters instead of paper ones. One such device is the Hario Woodneck Drip pot.
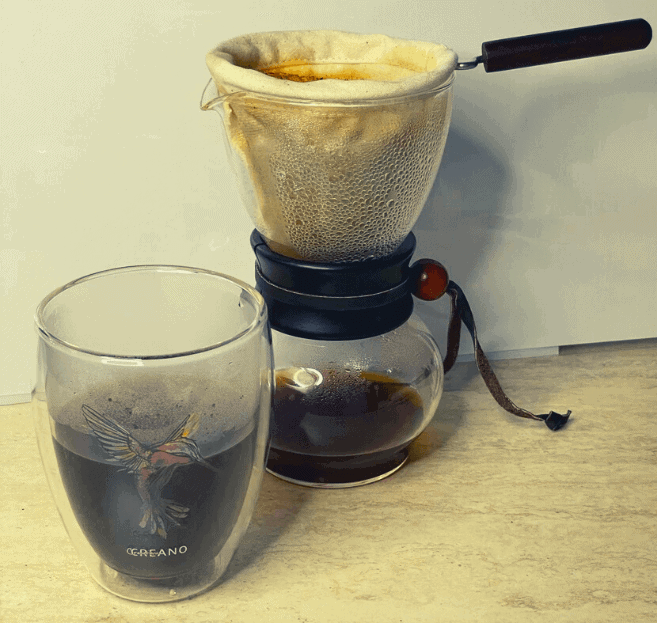
The flanel filter this device uses lets you prepare a type of brew that combines cleanness and texture in a unique way.
The cloth traps all the coffee fines, not letting any sediment pass into your cup. At the same time the bigger gaps in the fabric let more of the coffee oils pass through it, which results in a richer, fuller-bodied cup.
The downside of using this type of filter is that it’s harder to maintan it and prevent it from getting unpleasant moldy scent.
Check out my Hario woodneck drip pot review and brewing guide for more information on using and upkeeping this outstanding pour-over device.
Initial Cost in Relation to Additional Equipment
When it comes to equipment, the only thing you need to get in addition to your AeroPress in order to achieve better results is a grinder.
Since the AeroPress is more forgiving in comparison to pour-over devices, you don’t need to invest in an expensive one.
The JavaPresse or the Hario Skerton are both budget-friendly grinders that will work well enough with this device.
Naturally, a higher-quality grinder will definitely make an improvement in your AeroPress brew.
That being said, I have a co-worker who was even using pre-ground coffee with his AeroPress at work and was satisfied with the results.
The option of using pre-ground commodity coffee, bought from a supermarket, for making cup in a pour-over device is pretty much non-existent.
Yes, you may use pre-ground coffee with some more forgiving pour-over drippers such as this one by Simply Charmed.
But with most pour-over brewers, if you’re not using a proper coffee grind, you’ll most likely end up with either under- or over-extracted coffee.
Just make sure you point out what coffee brewing device you are to use, as this way the beans will be ground accordingly.
If you get yourself a pour-over brewer, you will have to look for a more precise grinder that provides the needed grind consistency for proper extraction.
You can find detailed information on what to look for in a pour-over grinder by clicking here. In the linked post, I also point out the best products for this brewing method.
By going over the recommended items I’ve reviewed, you will find that they are more expensive than a grinder that is good enough for an AeroPress.
Especially if you go for a Chemex or a V60 – the speed at which you pour the water onto the coffee bed is pretty important. This type of kettle will provide the needed control.
Of course, with a more forgiving pour-over device such as the Walküre, you don’t need a gooseneck kettle.
Related Post: Best Gooseneck Kettles – Electric and Stovetop Products Reviewed
You will need a coffee scale as well, as the coffee-to-water ratio is also essential when it comes to pour-over brewing.
This ratio is important when making AeroPress coffee too, but you could get a pretty good cup of coffee by using volumetric measurements.
Actually, the AeroPress inventor’s classic recipe is by volume, not weight.
You will have to spend more on additional equipment in order to fully experience the true colors of your pour-over coffee.
If you go for an AeroPress, however, you will get a package of 350 filters, a scoop, a funnel to pour in the grounds into the chamber with ease, and a stirrer – all included in its price.
You can check the photo below to see what comes in an AeroPress box:

You can use the AeroPress scoop to measure your grounds if you’re not ready to invest more money, time and effort in the coffee brewing process.
So a scale isn’t really necessary if you’re looking for a simply good cup of coffee.
You don’t need a gooseneck kettle to pour in the water into the chamber too.
So that’s another thing that you don’t have to consider as a necessity.
Which One is Better for Travelers?
Perhaps, you travel often and you need easily portable coffee gear. Rr you want to be able to easily take your brewing device to work?
In that case, the AeroPress is a better option compared to a pour-over brewing device.
You can make great coffee with it, and at the same time, it’s famous for its longevity and sturdiness. This makes it possible for you to carry it around free of worries.
The ultimate budget-friendly travel combo is a JavaPresse grinder with an AeroPress brewer – nothing can beat this compact combination. An even higher-quality hand grinder that perfectly fits into an AeroPress and doesn’t take any more room is the Timemore Chestnut X Lite.
By the way, there is also a travel press available – the AeroPress Go.
You can see it in the following photo:

Its brewing chamber is tinier, but it’s compact and perfect for travelers.
It also comes with a mug that fits all other parts and when you close it with the red lid – it’s really convenient to carry around.
The filter case is also a useful accessory that will keep your filters together when traveling.
It virtually lets you have pour-over coffee wherever without having to carry around all the equipment.
It’s hard for me to believe that it performs well, but I’d love to know if some of you have any sort of experience with it.
Please, drop me a comment below if you do.
How Much Coffee Do You Want to Make at a Time?
If you want to make a larger amount of coffee at a time, the pour-over brewing devices are generally considered to be the better alternative to an AeroPress.
As I mentioned earlier, many people would say that if you’re about to brew more than 2 cups at a time – go for pour-over.
By increasing the coffee-to-water ratio, you can easily make up to 12 fl. oz. – 16 fl. oz. of coffee at a time.
Of course, the taste of a cup made with a AeroPress coffee concentrate, which is later diluted, is different than one brewed with all the water passing through the grounds.
Nevertheless, they both taste great and you won’t be disappointed.
You can think of the diluted version as an AeroPressAmericano. You can top up the AeroPress coffee concentrate with milk too.
In time you may feel inspired to start experimenting and come up with a custom AeroPress recipe that suits your taste best.
You can play around with the grind size, the water temperature, switch up the standard with the inverted method, and adjust the extraction process however you like, until you yield the perfect cup.
And overall, by getting yourself an AeroPress you will pretty much become a part of a cool open-minded community of people that love exploring the world of coffee.
Conclusion
Both the AeroPress and the pour-over brewing methods are great if you’ve decided to turn your coffee drinking habit into a passion and hobby of yours.
Go for the former, if you’re not ready to invest much money and effort yet.
You can also opt for some of the more forgiving and affordable pour-over devices such as the Melitta.
Most probably, in time you will naturally start experimenting and get more involved in the process of brewing.
You will get excited about how different variables affect your coffee’s flavor.
If you feel ready to invest more and dive deeper into the world of coffee – a pour-over device such as the Hario V60 or the Chemex are both perfect choices.
Especially if you enjoy brighter and cleaner cups.
I hope I managed to help you out.
Please, drop a comment below to share which one you’ve chosen or if you have any questions.
I’d love to see your thoughts.