
Maintaining your coffee brewing devices is necessary to extend their life and proper performance. That’s why I decided to share a post on how to clean a Moka pot after use. Furthermore, I’ll share some tips on how to clean an old coffee pot that hasn’t been maintained quite well.
There’s a popular belief that you shouldn’t clean your stovetop coffee maker regularly. Many people say that the coffee oil buildup in the upper chamber actually improves the flavor of your brew. This suggests that you shouldn’t clean the Moka pot regularly to let the coffee oils accumulate.
Nonetheless, I’m definitely not a supporter of this low-maintenance thesis. The coffee oil buildup in the upper chamber will make your coffee taste even more bitter and may add rancid flavors to the brew. Therefore, I recommend washing your Moka pot after each use.
If you take care of your coffee pot, apart from getting a better coffee flavor, you will also improve its safety.
The Moka pot is a pressurized coffee brewing device, which has a safety valve that prevents too much pressure from building up.
Not taking care of your pot for too long may cause a safety valve malfunction and your Moka pot may even explode.
So a descaling cycle and a deep clean every once in a while are also essential.
Luckily, the whole process of maintenance is pretty much effortless.
The thing is that most Moka pots are made of aluminum, which means that they oxidize easily.
So you can’t just throw your coffee pot into the dishwasher, as the strong dishwasher detergents will ruin it.
So without further ado, let’s move on to the cleaning guide.
How to clean your Moka pot after use
To clean your Moka pot after each use, you pretty much need to dismantle it and rinse all its parts.
Even though you shouldn’t place it in the dishwasher, you can use regular dish soap and a non-abrasive sponge or a pad to remove the coffee dirt from your coffee pot.
So here’s how to clean a Moka pot:
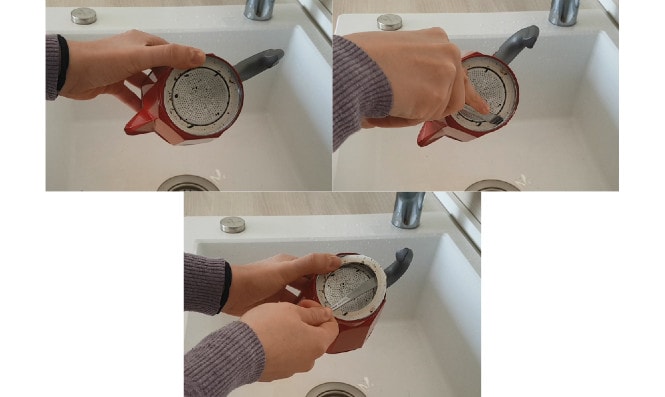
1. Unscrew the upper Moka pot chamber, take the filter basket, empty it and rinse it.
![]()
After you do that, put the filter basket aside and continue with the following step.
You can check out my post on how to reuse the coffee grounds, if you’re interested. I don’t recommend throwing them down the drain (you can check out why in this post).
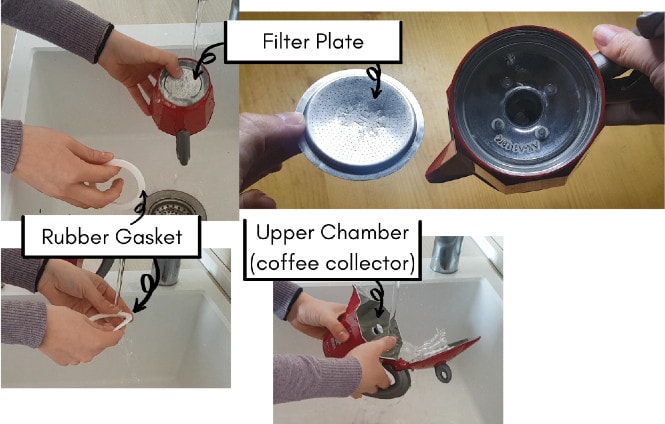
2. Take the upper Moka pot chamber (also called coffee collector) and remove the rubber gasket.
You can easily do that with a teaspoon handle.
By removing the circular rubber gasket, you will get access to the upper chamber’s filter plate.
3. Rinse the rubber gasket and the filter plate, as well as the upper Moka pot chamber.
If you haven’t taken care of your coffee pot for a while, feel free to use a non-abrasive sponge and a bit of dish soap to wash away the oil buildup.
I’d just rinse thoroughly the upper chamber with warm water.
If you don’t do that short after brewing, it won’t be as easy for you to clean the Moka pot without the use of a soft non-abrasive pad and/or dish soap.
I’d normally detach the rubber gasket and rinse it along with the filter plate and the inside of the chamber only once a week when I use my coffee pot daily.
It doesn’t take a lot of time and effort to dismantle these Moka pot parts, but it’s understandable why you wouldn’t want to deal with them every day.
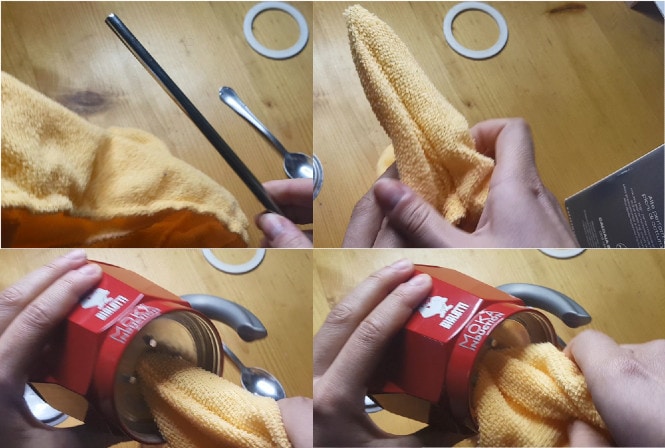
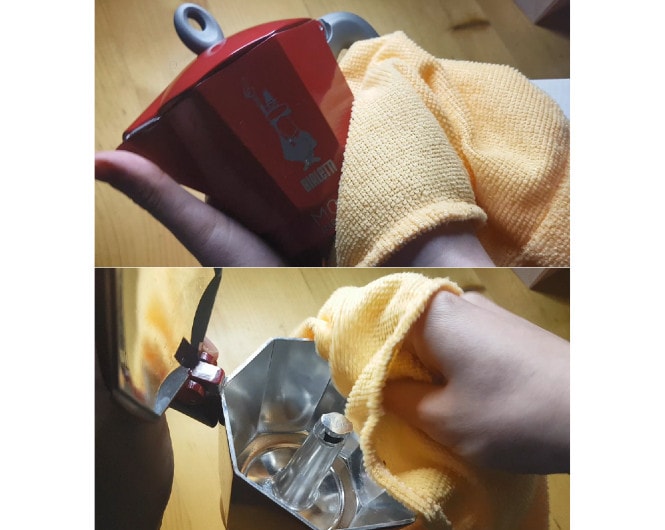
Another thing that I do once a week is to clean the small column in the coffee collector, by using a cloth/towel and a metal straw or the handle a knife.
I put the towel over the straw and use it to wipe off the inside of the small funnel.
You can see how I do it in the photo below.
It’s quite easy to put the attach back the filter basket and the rubber gasket, so don’t worry about it.
4. Rinse the water container (also known as heating vessel).
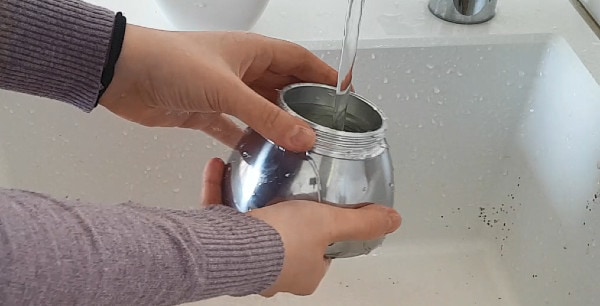
As mentioned earlier, you can use dish soap for the lower Moka pot chamber too.
I have an induction Moka pot by Bialetti, which has a stainless steel heating vessel, which can also be placed in the dishwasher.
Nonetheless, I’ve never done that, as it’s easier for me to wash the water container along with the other coffee pot parts.
5. Dry each Moka pot part with a towel.
It’s important to thoroughly wipe off the water droplets from your coffee pot. This way you’ll avoid water stains.
You can use a paper towel, a kitchen towel, or a cloth for this purpose.
This is the final, yet one of the most important steps when it comes to the cleaning of a Moka pot.
By drying your coffee brewer after washing it, you will preserve its looks and proper performance for much longer.
Descaling of a Coffee pot
Every once in a while, you need to descale your Moka pot.
How often? Well, it depends on the hardness of the water you’d normally use.
To descale a Moka pot you can either:
- Use a homemade descaling solution:
- Use 1.5 to 2 tablespoons of citric acid and dissolve it in warm water.
- Use equal parts of white vinegar and water.
- Use a commercial descaling solution.
Do the following if you want to descale your stovetop coffee pot:
- Fill the water container with one of the aforementioned descaling solutions.
Make sure the liquid reaches to just below the safety valve.
No matter if you make coffee in a Moka pot, or you descale it, the safety valve shouldn’t ever be covered with water. - Assemble the Moka pot and place it on the stove.
The temperature of the solution will start increasing and you will see that water starts appearing in the upper chamber of your coffee pot. - When the solution has already gone through the small column into the coffee collector, remove the Moka pot from the stovetop and rinse it.
After descaling and rinsing, you can run 1 or 2 only-water cycles through your Moka pot, to remove any smell that may have remained from the descaling solution.
How to clean an old Moka pot
To clean an old Moka pot that hasn’t been maintained quite well, I recommend starting with dismantling it and cleaning each one of its parts with dish soap.
You can use a non-abrasive sponge or pad for this purpose.
Make sure you remove the rubber gasket and clean it thoroughly along with the filter plate and the small column, as shown in the photos in the first section of this post.
After you’ve already deeply cleaned your old Moka pot and all of its parts with dish soap, continue on with descaling. Follow my directions in the previous section to do that.
After descaling, if you’re still not happy with how your Moka pot looks, prepare a solution of 50% white vinegar and 50% water. Immerse a cloth into the solution and start rubbing it onto the discolored aluminum areas until you’re satisfied.
Instead of using a cloth, you can also use a non-abrasive pad.
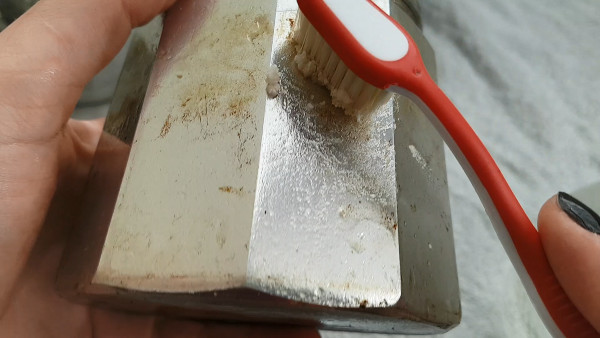
If there are still discolored areas despite your effort, mix 1 tablespoon of cream of tartar and a tiny bit of water – just enough to form a paste.
You can use a soft toothbrush to grab some of the paste and coat it over the discolored areas. After coating, leave the paste of cream of tartar on the metal for ten minutes.
Instead of using cream of tartar, you can mix half a teaspoon of baking soda and a bit of lemon juice to make a paste for coating the discolored areas.
After the paste has remained on the metal’s surface for 10 minutes, remove it with a wet cloth.
Then you can thoroughly rinse your Moka pot with water and dry it with a towel.
After this cleaning procedure, your old Moka pot should look much better.
If its condition wasn’t that bad to start with, your stovetop coffee maker will even look like brand new.
Final Words
I hope that you found my Moka pot cleaning guide useful.
If you maintain it properly you won’t have to deal with a moldy or rusty coffee pot.
On the other hand, even if you haven’t maintained it well, you can use my tips on how to clean your old Moka pot to make it look good again.
Furthermore, by following my guidance you may even enjoy the coffee you make in Bialetti’s invention more.
Drop me a comment below if you have any questions or simply share your input and experience with the maintenance of your coffee pot.